
DIY Limestone Walkway for Better Drainage and Curb Appeal
I’ve been itching to replace our ugly, puddle-filled walkway ever since we moved in. Nothing about it worked—it was a patchwork of mismatched pavers left from the previous owners, full of muddy divots, and instantly turned into a mini pool when it rained.


So I decided to finally tackle it. The goal? A beautiful limestone paver walkway that’s durable, drains well, and actually adds curb appeal with a functional walkway.
For even more info, check out the detailed tutorial video here!
Materials and Planning
Tools/Materials I used for this project:
1×2 limestone pavers (2″ thick)
½″ crushed limestone (base)
Leveling sand + 1″ crushed limestone (joint infill)
Gorilla Cart: https://bit.ly/49KDp2e
Spade Shovel: https://rivr.link/MRG-9BYEON
Square Shovel: https://rivr.link/MRG-rqJ9u2
String Line: https://rivr.link/MRG-tNJj91
Hand Tamper: https://bit.ly/45qHeZv and Plate Compactor
Limestone Sealer: https://bit.ly/40UcaQs
Step 1: Remove the Old Walkway and Prep the Area
The first job was to get rid of the old “walkway” (if you could call it that) and clear the ground down to bare dirt.


I used a string line to define the edges and then a spade shovel to dig out the interior. My Gorilla Cart was a lifesaver for hauling dirt away.


Once all the old pavers and dirt were cleared, I tamped down the soil base with a hand tamper to make it solid. For the later steps, I upgraded to a rented gas-powered plate compactor.
Pro tip: dampening each layer slightly helps everything compact tight and stay put.

Keep in mind that there is much more info and visuals in the build video.
Step 2: Create a Drainage-Friendly Base Layer
Most people go with a compactable road base, but my local stone yard recommended ½″ crushed limestone for better drainage. This was important because our walkway area had always held water. I shoveled about 2 inches of limestone into place, starting from one end and working across.

For the areas right next to the trailer, I shoveled straight in — easy. For the farther reaches, the Gorilla Cart came in super handy once again.
After spreading the limestone evenly, I misted it with water to help with compaction, then made a couple passes with a gas powered plate compactor that I rented from Home Depot.

Let’s talk about weed barrier for a second—because I didn’t use any here, and that was very much on purpose.
This area already has some drainage issues, and laying down plastic fabric would’ve just made that worse. Weed barrier can trap water instead of letting it drain properly, especially when it’s sandwiched between layers. That leads to soggy ground, shifting pavers, and a whole mess I don’t want to deal with later.
Plus, most of the time, weeds don’t even come from underneath your walkway. They show up when seeds blow in and land between the pavers—so a weed barrier doesn’t really stop that anyway. And honestly, it’s just more unnecessary plastic in the ground. Instead, I focused on doing a solid base with well-compacted crushed rock and clean leveling sand.
Step 3: Level the Sand Layer
Over the compacted limestone base, I added a couple inches of leveling sand.

To get it perfectly even, I laid down two long PVC pipes, making sure they were completely level and parallel, and filled in between them with sand. Then I used a scrap board as a screed, dragging it along the pipes to smooth the sand to a consistent depth.

Once the screeding was done, I misted the sand with water, tamped down the pipe tracks by hand, and gave the whole surface a final compaction pass with the plate compactor.

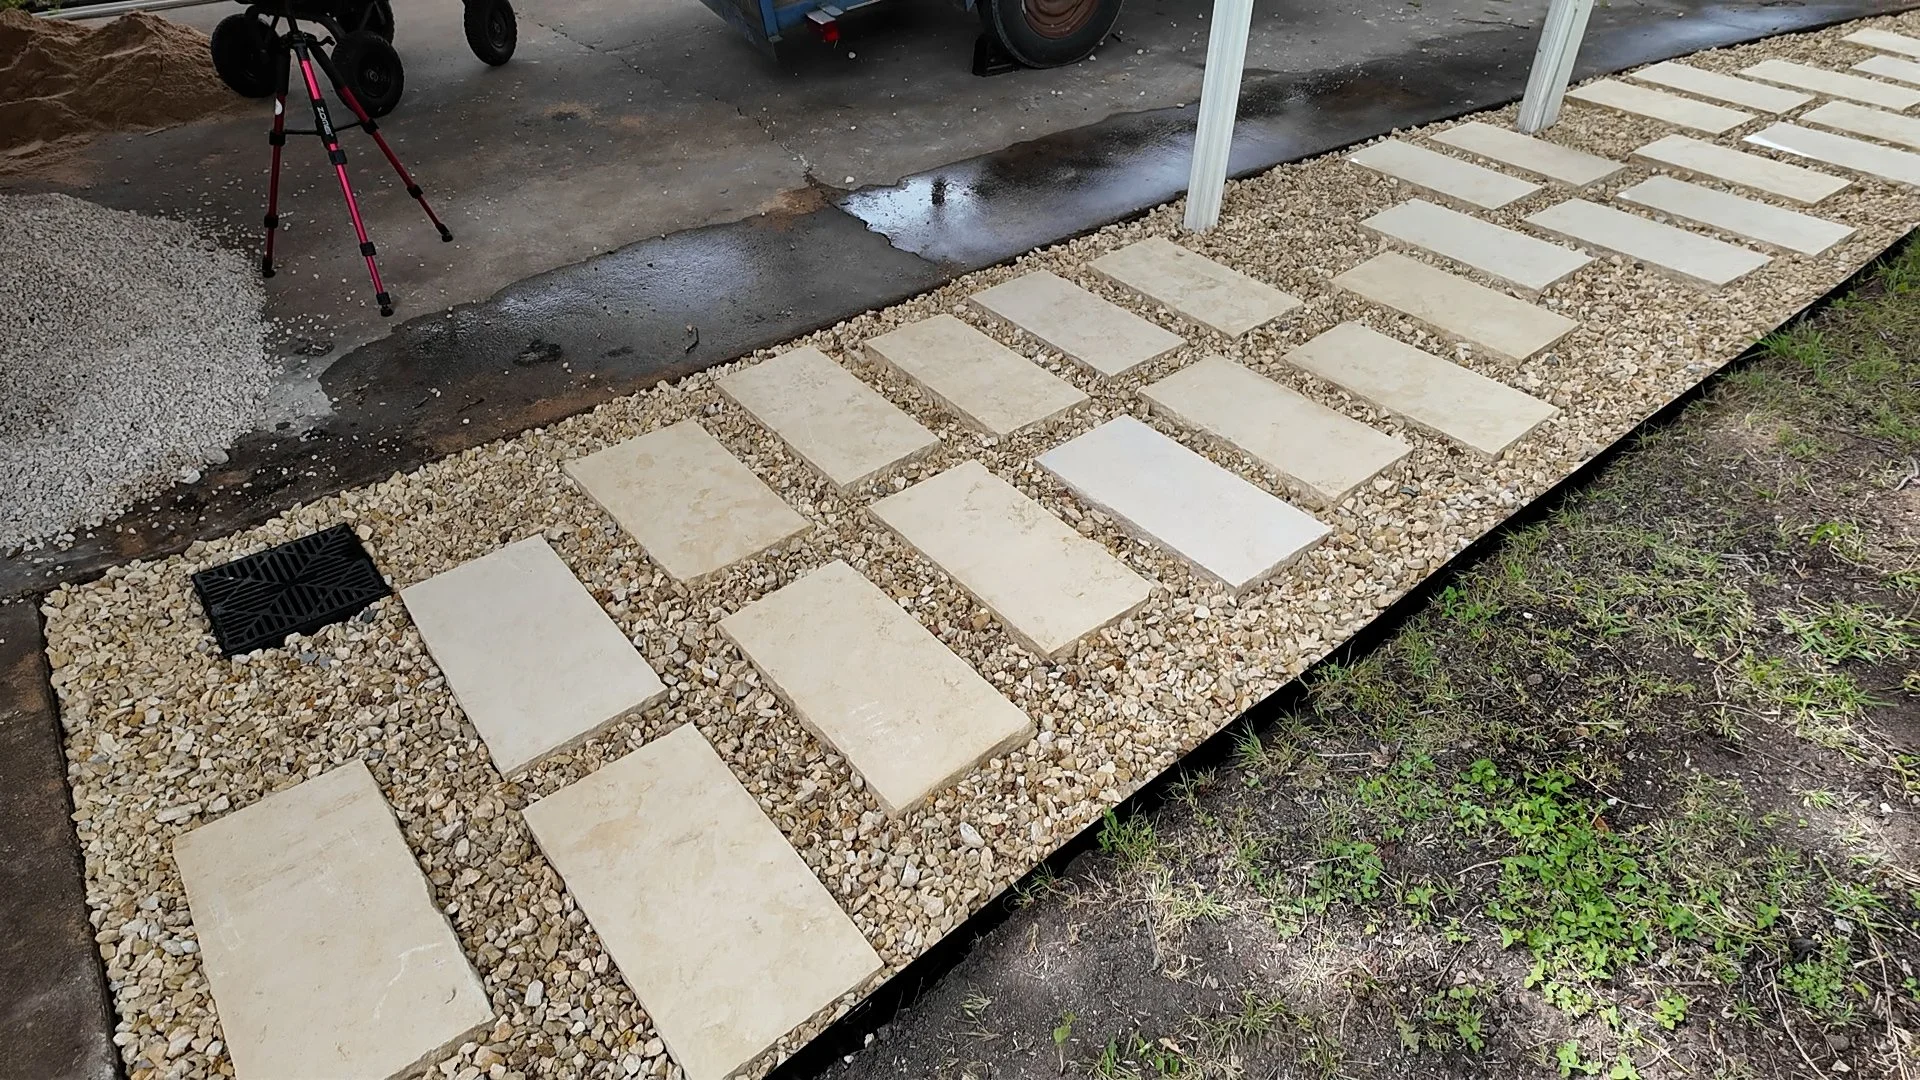
Step 4: Lay the Pavers
The fun part — placing the pavers. I used 1×2 limestone pavers that are a sturdy 2″ thick.

For a few years the walkway trend has been very modern and structured— with perfectly straight lines. But lately, I’ve been saving a ton of inspiration on Pinterest with a more organic, offset pattern. It feels a little more natural, and just better suited to our curved driveway and non-symmetrical path.

So I’m figuring out the layout as I go, keeping the spacing realistic and comfortable for walking—nothing too tight or too far apart. This kind of layout takes a little more eyeballing, but the end result feels way more custom and less cookie-cutter.

As I laid each paver, I checked for level and adjusted with sand underneath as needed. The goal was a smooth walking surface that still had an easy, organic flow.
Step 5: Fill the Joints with Crushed Limestone
To keep the look cohesive, I filled in around the pavers with 1″ crushed limestone — the same tone as the pavers themselves. This choice not only ties the whole walkway together visually, but also encourages good drainage by letting rainwater pass through easily.

Step 6: Seal The Pavers
Once everything was in place, I applied a penetrating stone sealer to the pavers. Limestone is naturally porous, so sealing helps protect it from staining, weather damage, and the freeze-thaw cycle. It also enhances the color slightly while keeping the surface breathable, so moisture can still escape. This extra step means less maintenance and keeps the walkway looking fresh for years.


Landscaping
Done! I cleared out the plants that didn’t match our vision and brought in shade-loving varieties that tie in beautifully with our home. It’s the perfect finishing touch—like icing on the cake.


Finished
What was once a sloppy, flooded mess is now a clean, functional walkway that drains beautifully — even during heavy rain. It’s a huge boost for our curb appeal and one of those projects that makes me smile every time I step outside. It ties the yard together, enhances the landscaping, and I couldn’t be happier with the result.

And for fun, below is a photo of the house when we bought it. I absolutely love seeing how far we’ve come.

Want to see the full project video walkthrough? Click below.
You Might Also Like These Projects!


Follow Maker Gray:
Instagram @MakerGray https://www.instagram.com/makergray/
Facebook https://www.facebook.com/MakerGray/
TikTok: https://bit.ly/3lXgdHh
If you liked this project and want to stay up to date with what I’m building, be sure to sign up for my newsletter and you’ll get an email sharing new DIY projects!