
How to Build a Stock Tank Pool Deck

If you've got a stock tank pool, you already know it's a total backyard game changer. But once you're in it, you start noticing all the things that would make it better. Somewhere to set your drink. A spot to sit with your feet in the water. A place to lay out. Somewhere to stack the towels, the speaker, the sunscreen.
That's exactly why I built this deck.
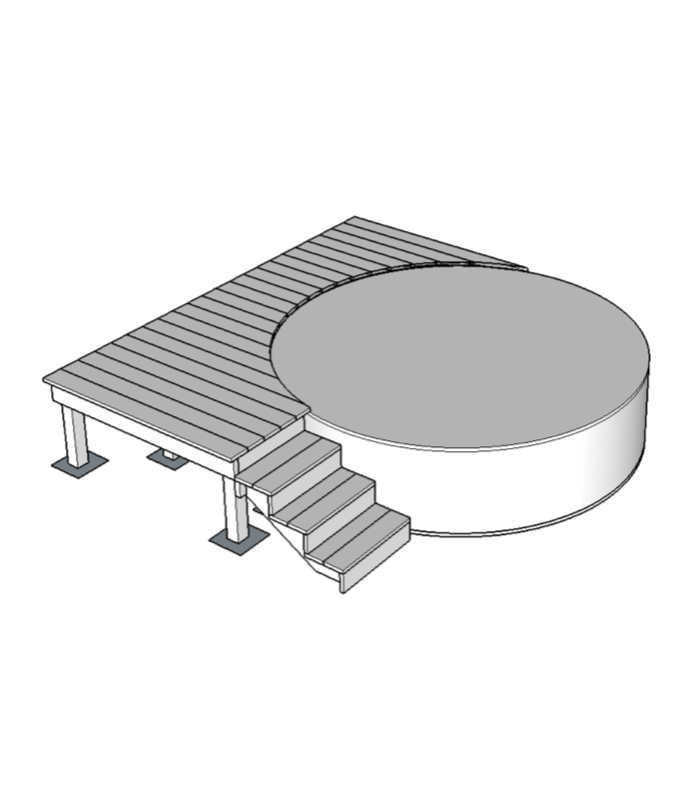
I designed it for my 8' stock tank pool — it has a side entry platform, three stairs, and a secret hatch so I can still access my pump and filter underneath without dismantling anything. It's sturdy, it looks great, and it's completely buildable on your own even if you've never built a deck before.
The best part? This design is really easy to modify. Different size pool? Adjust the dimensions. Want the stairs on the other side? Move them. Want a bigger platform to hang out on? Extend the frame. The plans give you the blueprint and the logic — from there, make it work for your space.
Get the Full Build Plans
→Cut list, measurements, materials list, and all product links in one PDF
What You'll Build
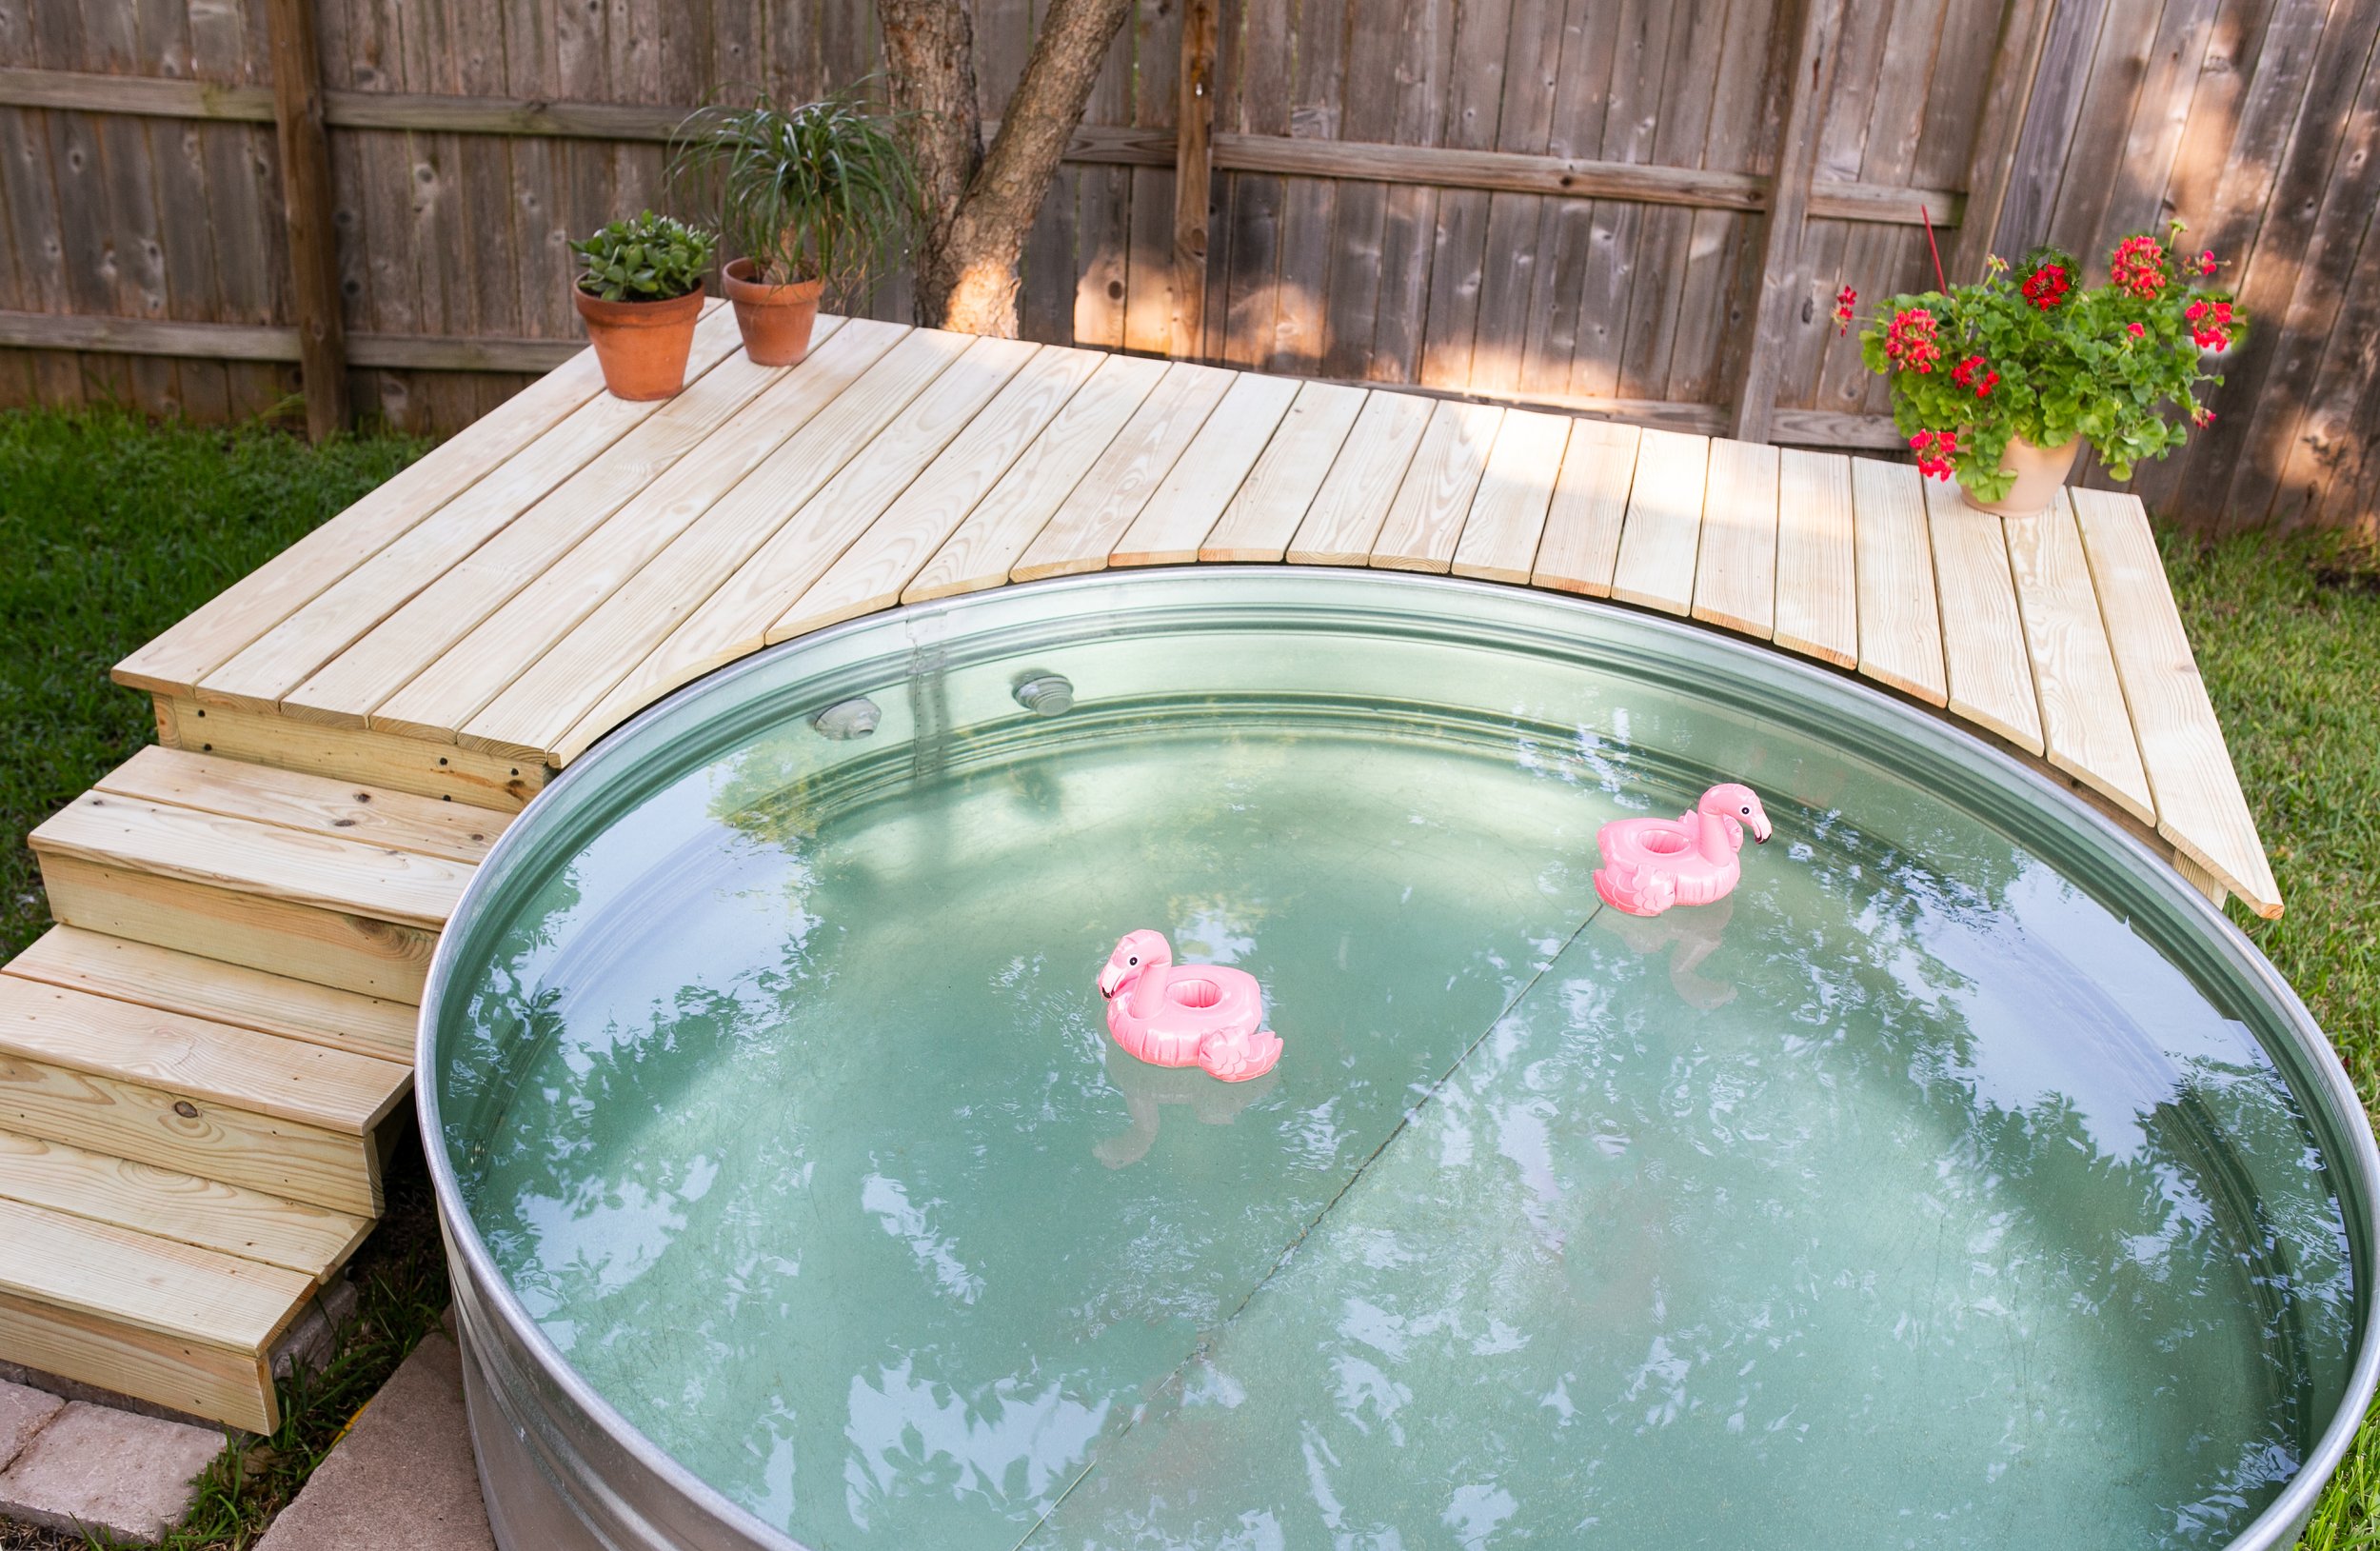
This deck is built to sit flush with the top of a standard 2' deep stock tank pool. Here's what's included in the design:
A side deck platform with a curved cutout that wraps the pool edge
3-step stair entry
Concrete pier block foundation — no digging, no mixing concrete
Pressure treated lumber throughout so it holds up season after season
Mine has been through multiple summers and still feels rock solid.
Watch the Full Build First
Before you dive in, I'd highly recommend watching the full build video — especially if you're a visual learner. A lot of these steps make so much more sense when you can see them happening in real time.
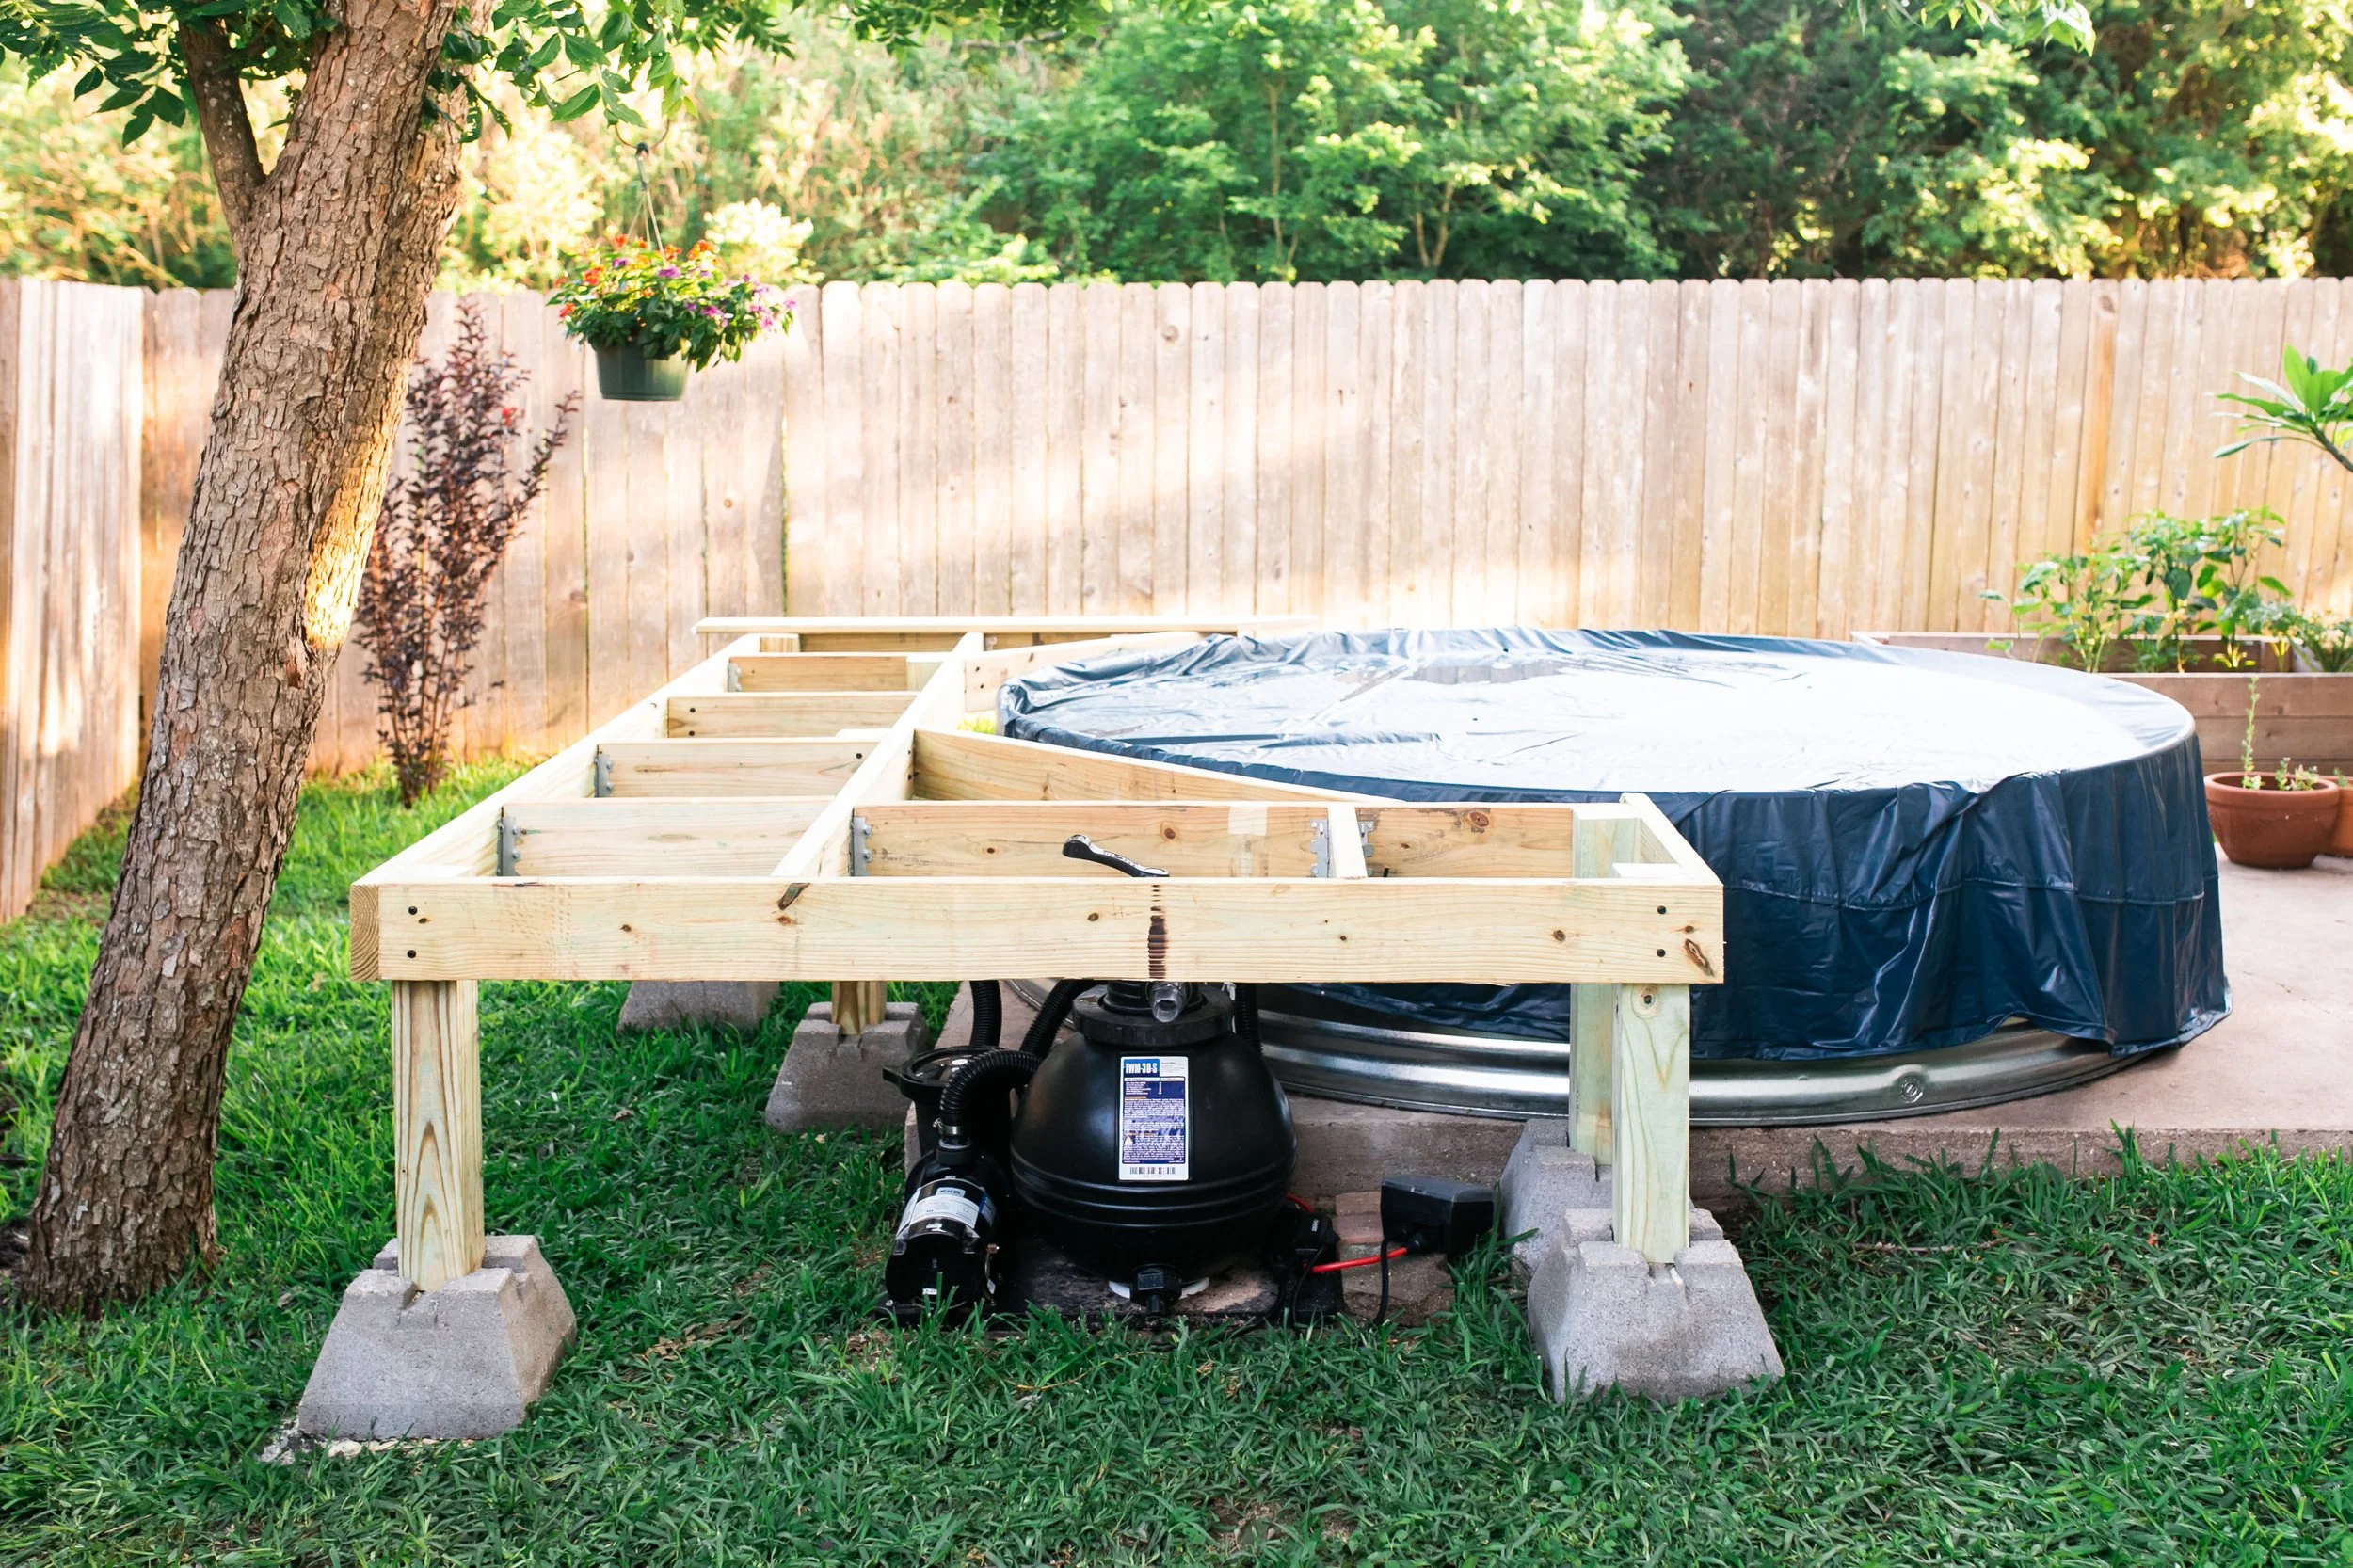
Before You Start: The Foundation
I started by wheeling in concrete pier blocks — these are the base of the whole deck. You could dig holes and set posts in the ground, but the pier blocks are a great option, especially if you ever want to move the deck. Way easier than you'd think.
I placed the blocks in their rough locations, made sure they were all level, and then set my treated 4x4 posts vertically in each one. One tip: leave your posts longer than you need them. You'll cut them flush later once the framing is up, and keeping them long gives you wiggle room if your ground isn't perfectly level — which it rarely is.


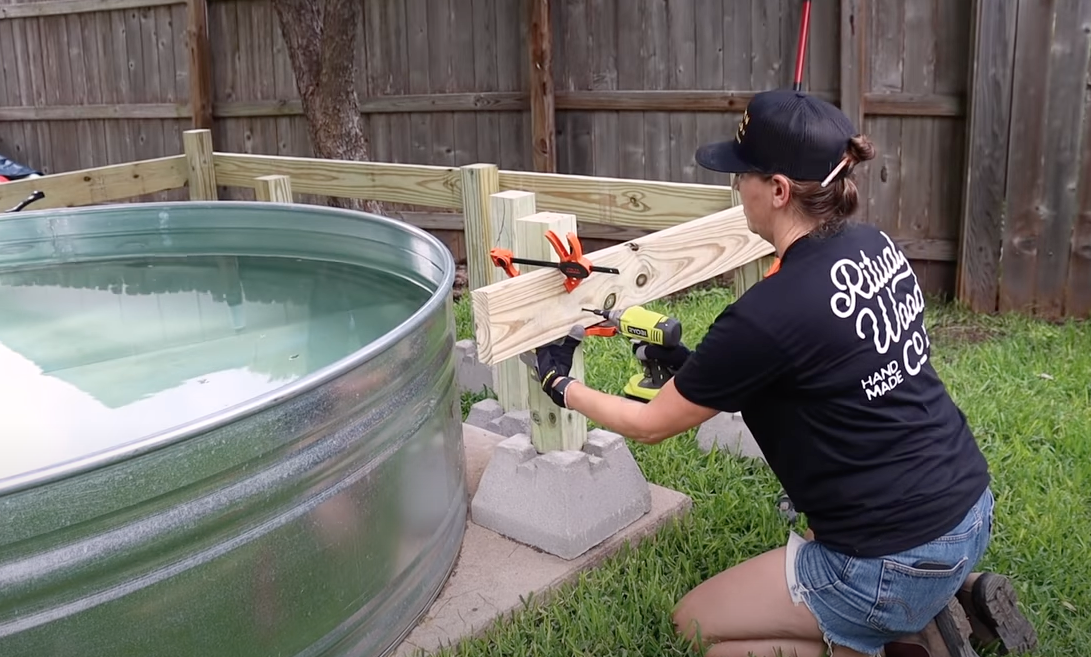
Framing: Building to Pool Height
All of the framing is 2x6 boards. The goal is to get your frame the same height as your pool so the deck boards end up sitting just above the top edge.
I set one end of a level on the pool itself to mark my build lines as I went. When you're working alone — which I was for most of this — clamps are your best friend. I used them like little shelf supports to hold boards in place while I got everything positioned before screwing in. I used TimberLok structural screws throughout the framing. These things are bomber.
For the interior joists, here's a solo installation trick: cut a scrap piece of 2x4 in half and temporarily screw each half to the top of the joist ends as a brace. This holds the joist exactly where it needs to be while you snug the joist hangers underneath and hammer them in. Pull the braces off when it's set and you're good to go.
Once all the framing was in, I used a reciprocating saw to cut all the 4x4 posts flush with the top of the joists.
This is one of those steps that's much easier to follow visually — watch the build video to see the joist hanger trick in action before you start.
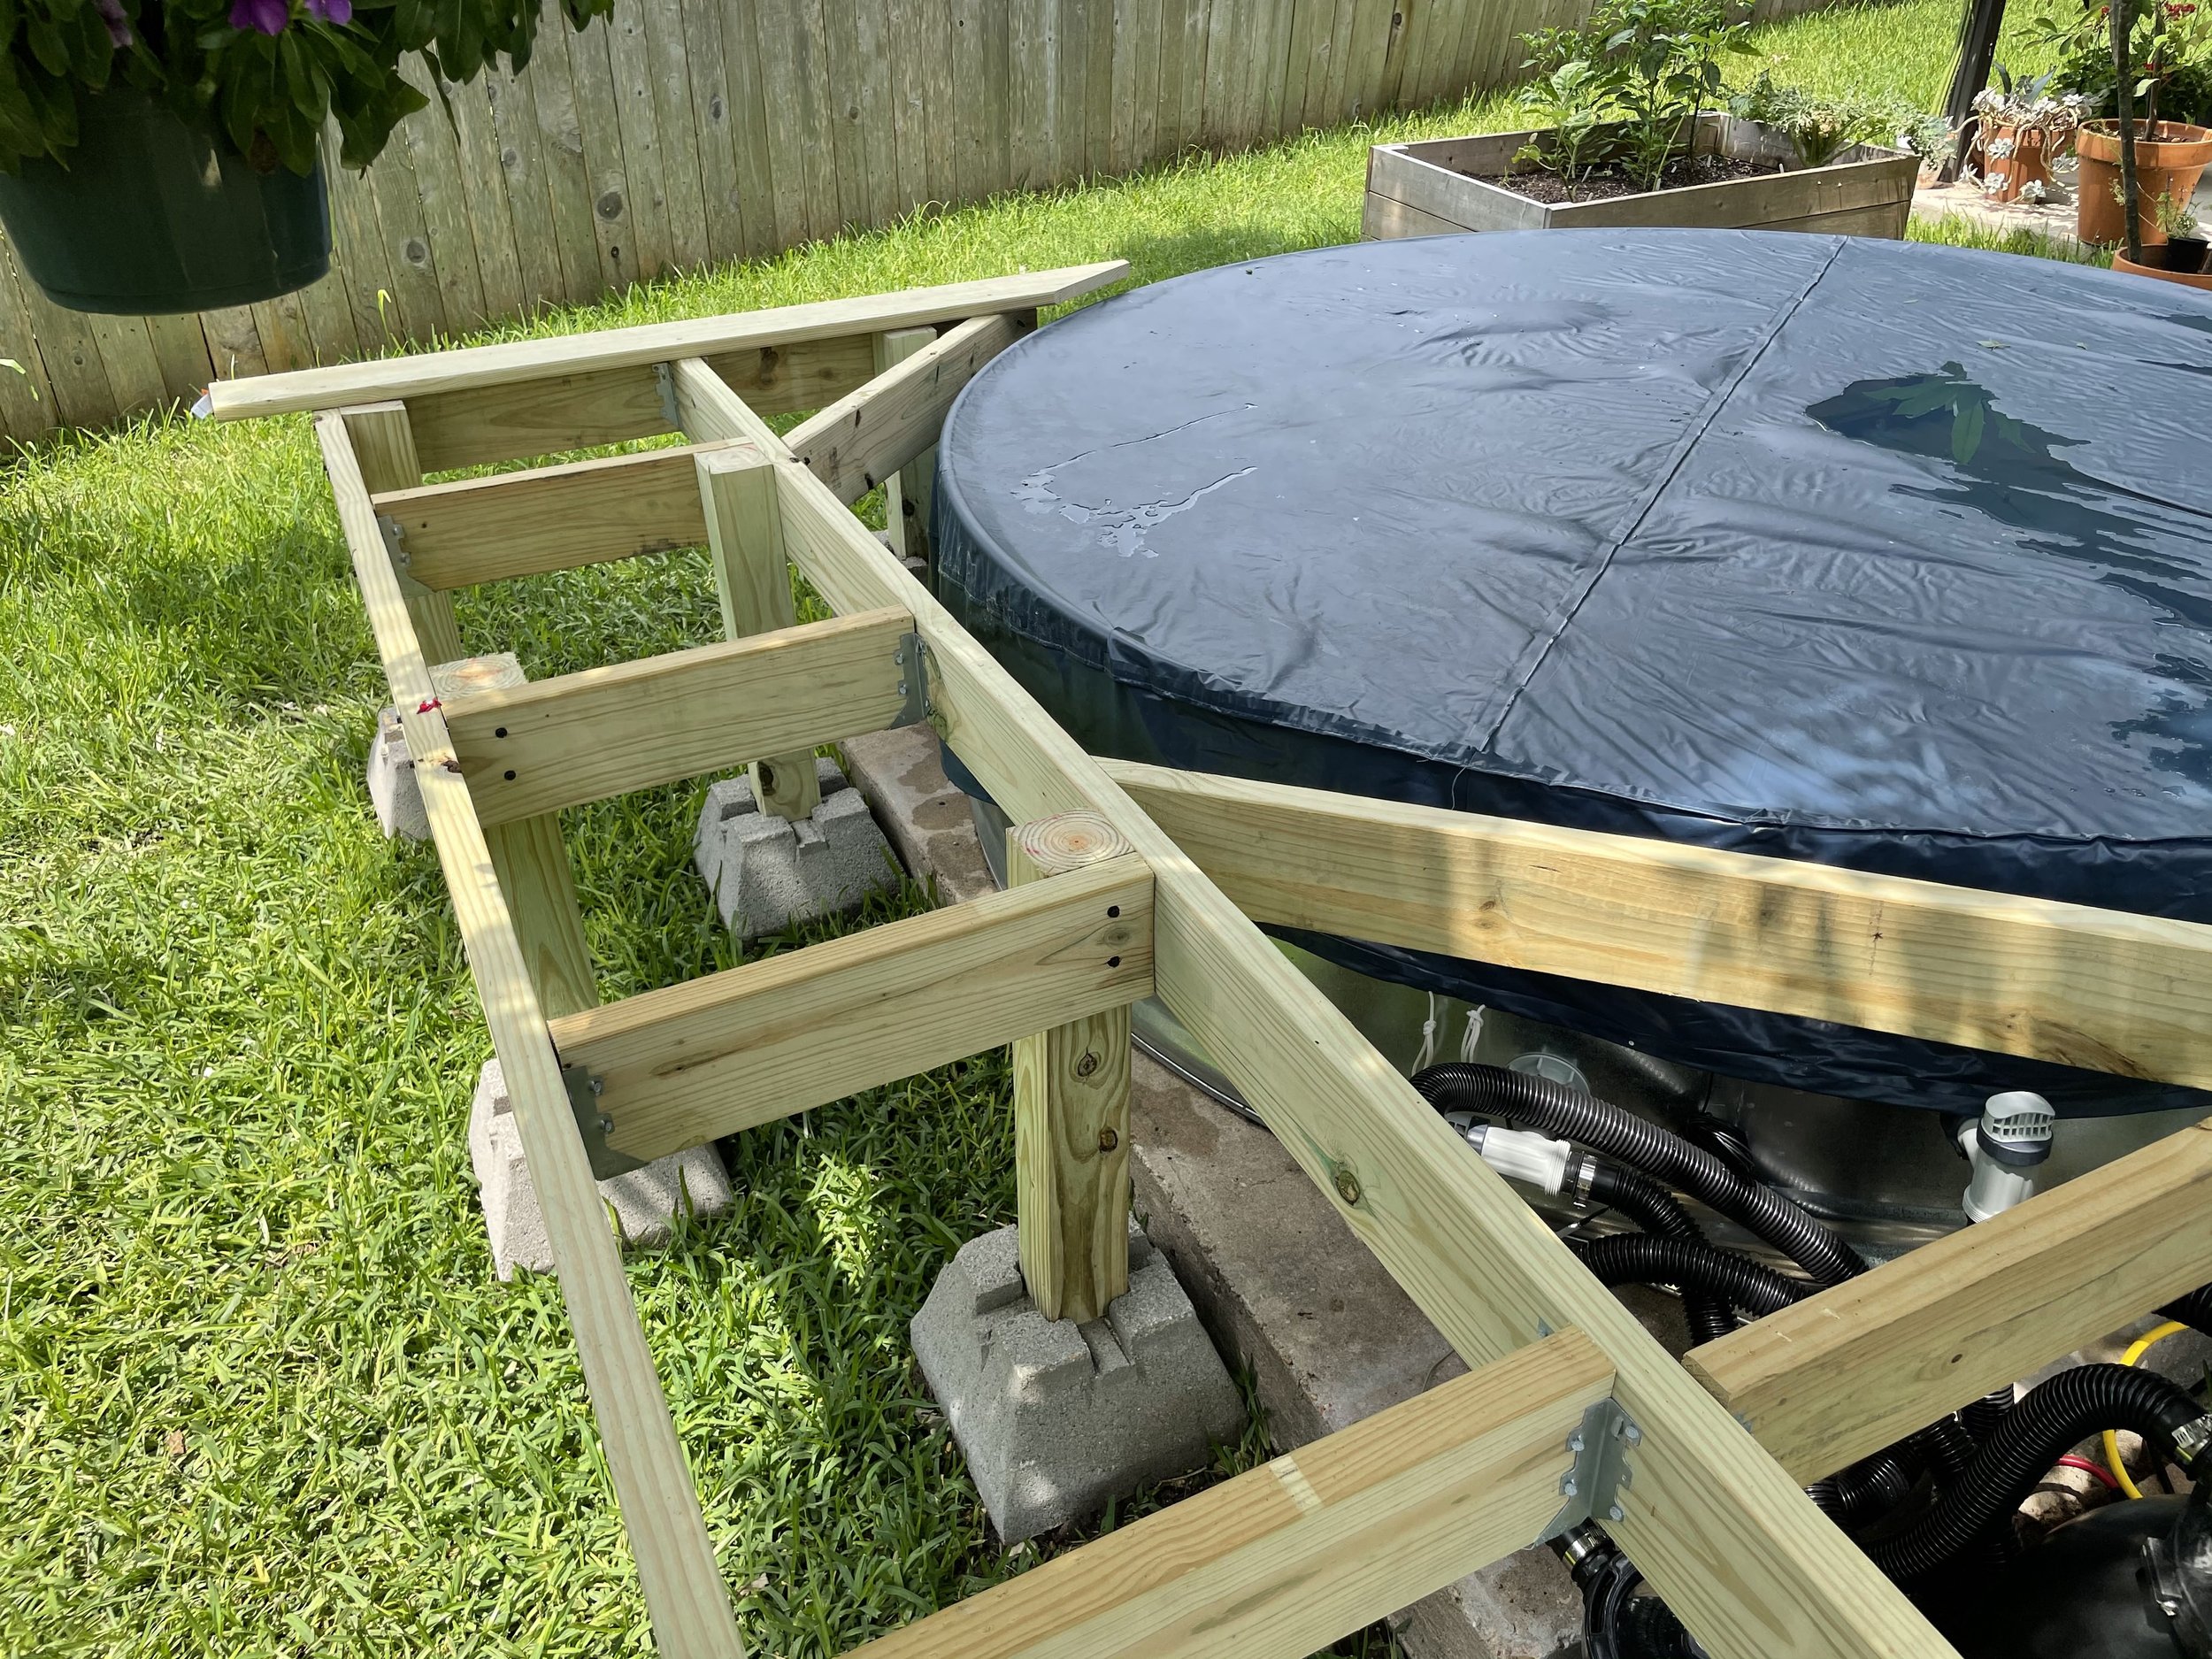
Corner Joists + Blocking
To get the curved shape where the deck meets the pool, I cut two 2x6 boards with 45-degree angles on each end using my miter saw and secured them as diagonal corner joists with TimberLoks.
Then I added blocking between the joists — short pieces of 2x6 that fill in the gaps and make the whole frame feel incredibly solid. I screwed them to posts where I could and used joist hangers where there were no posts nearby.
One honest note from my build: the concrete slab in my backyard was in the wrong spot, which meant I couldn't place two posts exactly where I wanted them for maximum support under the diagonal joists. If you're building on bare ground you won't have that problem — just make sure your posts support both the straight and diagonal joists. I've accounted for the ideal placement in the build plans.
Decking: The Satisfying Part
With framing done, it was time for deck boards. I used 5/4 pressure treated deck boards and started by making sure my first board was square to the frame, then pre-drilled and screwed each one down with exterior screws.
Make sure to sink those screws below the surface so you don't snag one while you're enjoying the deck later.
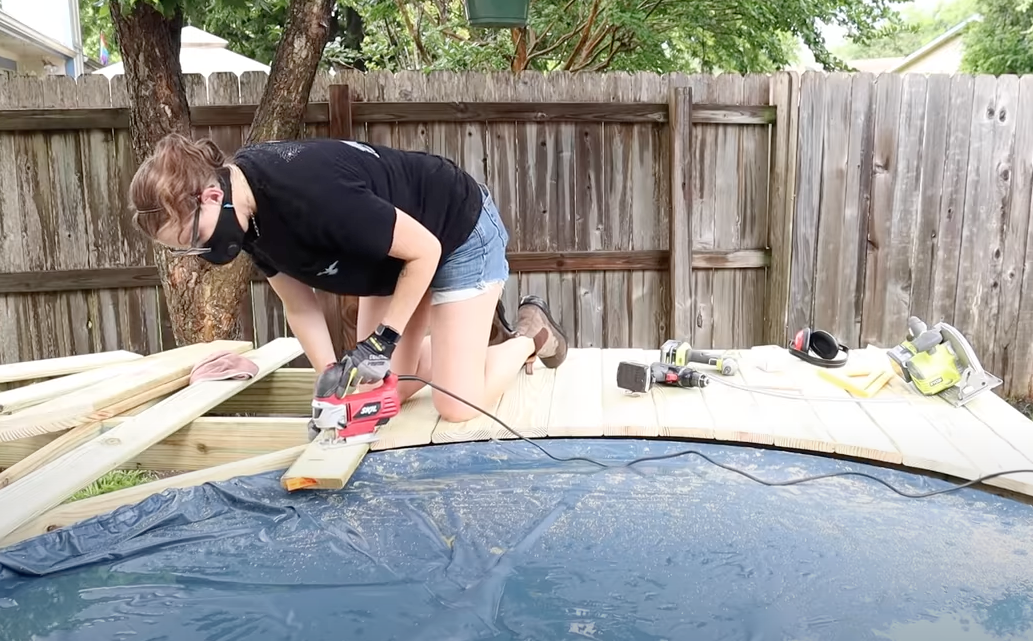
For the curved cutout around the pool, I cut each board as I went. The method that worked best: hold something flexible against the pool edge, line it up on both sides, trace the curve, cut with a jigsaw. When I didn't have a second set of hands to help, I picked up a flexible ruler that holds its shape — one hand holds the ruler, the other draws the line. Total game changer for this step.
Tip: Don't leave gaps between your boards. Treated lumber shrinks as it dries and creates its own gap naturally. If you leave gaps now they'll end up too wide.
I left the boards long on the back edge intentionally and cut them all flush at the end using my track saw with a clamped straight edge. A circular saw works just as well here.


The Secret Hatch (Bonus — Not in the Plans)
This is one of my favorite details of the whole build — fair warning though, it's not included in the plans because it really depends on your specific setup. But I wanted to walk you through it because it's easy to add and completely worth it.
My pump and filter sit underneath one side of the deck. I wanted to cover them for a clean look, but still need to access the controls from time to time. So I built a hidden hatch directly into the decking.
Here's how: once your deck boards are down, mark where your joists are on the boards covering the access area. Cut along those lines with a circular saw — this gives you three pieces. Then cut two short pieces of 2x4 and screw them to the inside faces of the joists, flush with the top, so the hatch has a ledge to rest on. The outer boards get screwed down permanently. The middle piece just lifts right out.
It pops up from underneath to reach the filter controls and drops seamlessly back in when you're done. Nobody knows it's there.
If your pump and filter are in a different spot — or you don't have one yet — keep this in your back pocket. The placement will be specific to your setup but the method is the same.
This one is much easier to understand visually — watch it in the build video here.


Building the Stairs
I picked up pre-made stair stringers from Home Depot and it made this part way easier than building stairs from scratch. I cut another 2x6 and screwed it to the 4x4 posts to create a dedicated attachment point for the stringers, leveled the ground and placed some pavers under the bottom for support, then held the stringers in place and marked my connector locations.
I used galvanized adjustable stringer connectors — they attach to the deck first, then to the stringer, and they make everything feel really solid.
For the treads, I cut 5/4 deck boards to width and doubled them up on each step — two boards per tread. Then I cut and installed one board per riser (the vertical piece between each tread).
I left the back side of the stairs open since that's where the pump is — when you run a backwash cycle, water sprays out and needs somewhere to go. Plus it's the back side; nobody sees it. I finished the visible side with a few trim pieces of decking and called it done.


Finishing Touches
Once the deck boards were all down and everything was cut flush, I let the treated lumber dry out for a few weeks and then applied deck sealer to protect it from sun and weather, which makes a real difference in how long the deck looks good.
Tools I Used
You don't need a full shop for this build — just a solid set of basics:
The full materials list with quantities and every product link is inside the build plans.
Get the complete materials list + build plans HERE
Want to Take It Further?
Once your deck is built, here are a few upgrades that make the whole setup feel really complete:
Build the stock tank pool itself — starting from scratch? Here's how I built the pool.

Keeps the pool shaded and cool on hot days. Total game changer.

I figured out how to use a propane heater to convert this same stock tank pool into a heated hot tub and still switch it back to regular pool mode.
Ready to Build Your Own?
The build plans have everything you need to make this happen — exact measurements, a color-coded cut list, full materials list, tool links, and step-by-step diagrams for all seven stages of the build.


See you on the next project!


You can find me on Instagram @makergray
If you liked this project and want to stay up to date with what I’m building, then be sure to sign up for my emailed newsletter and you’ll get an email when I post something new.
(Most of the links listed above are affiliate links. As an Amazon Associate I earn from qualifying purchases. Thank you for supporting me in this way.)