
How To Make A Stock Tank Pool
A stock tank pool is one of the best backyard projects you can do. It's inexpensive, it fits in almost any yard, it looks incredibly good, and once you have your spot leveled and your supplies ready, you can have it up and running in an afternoon.
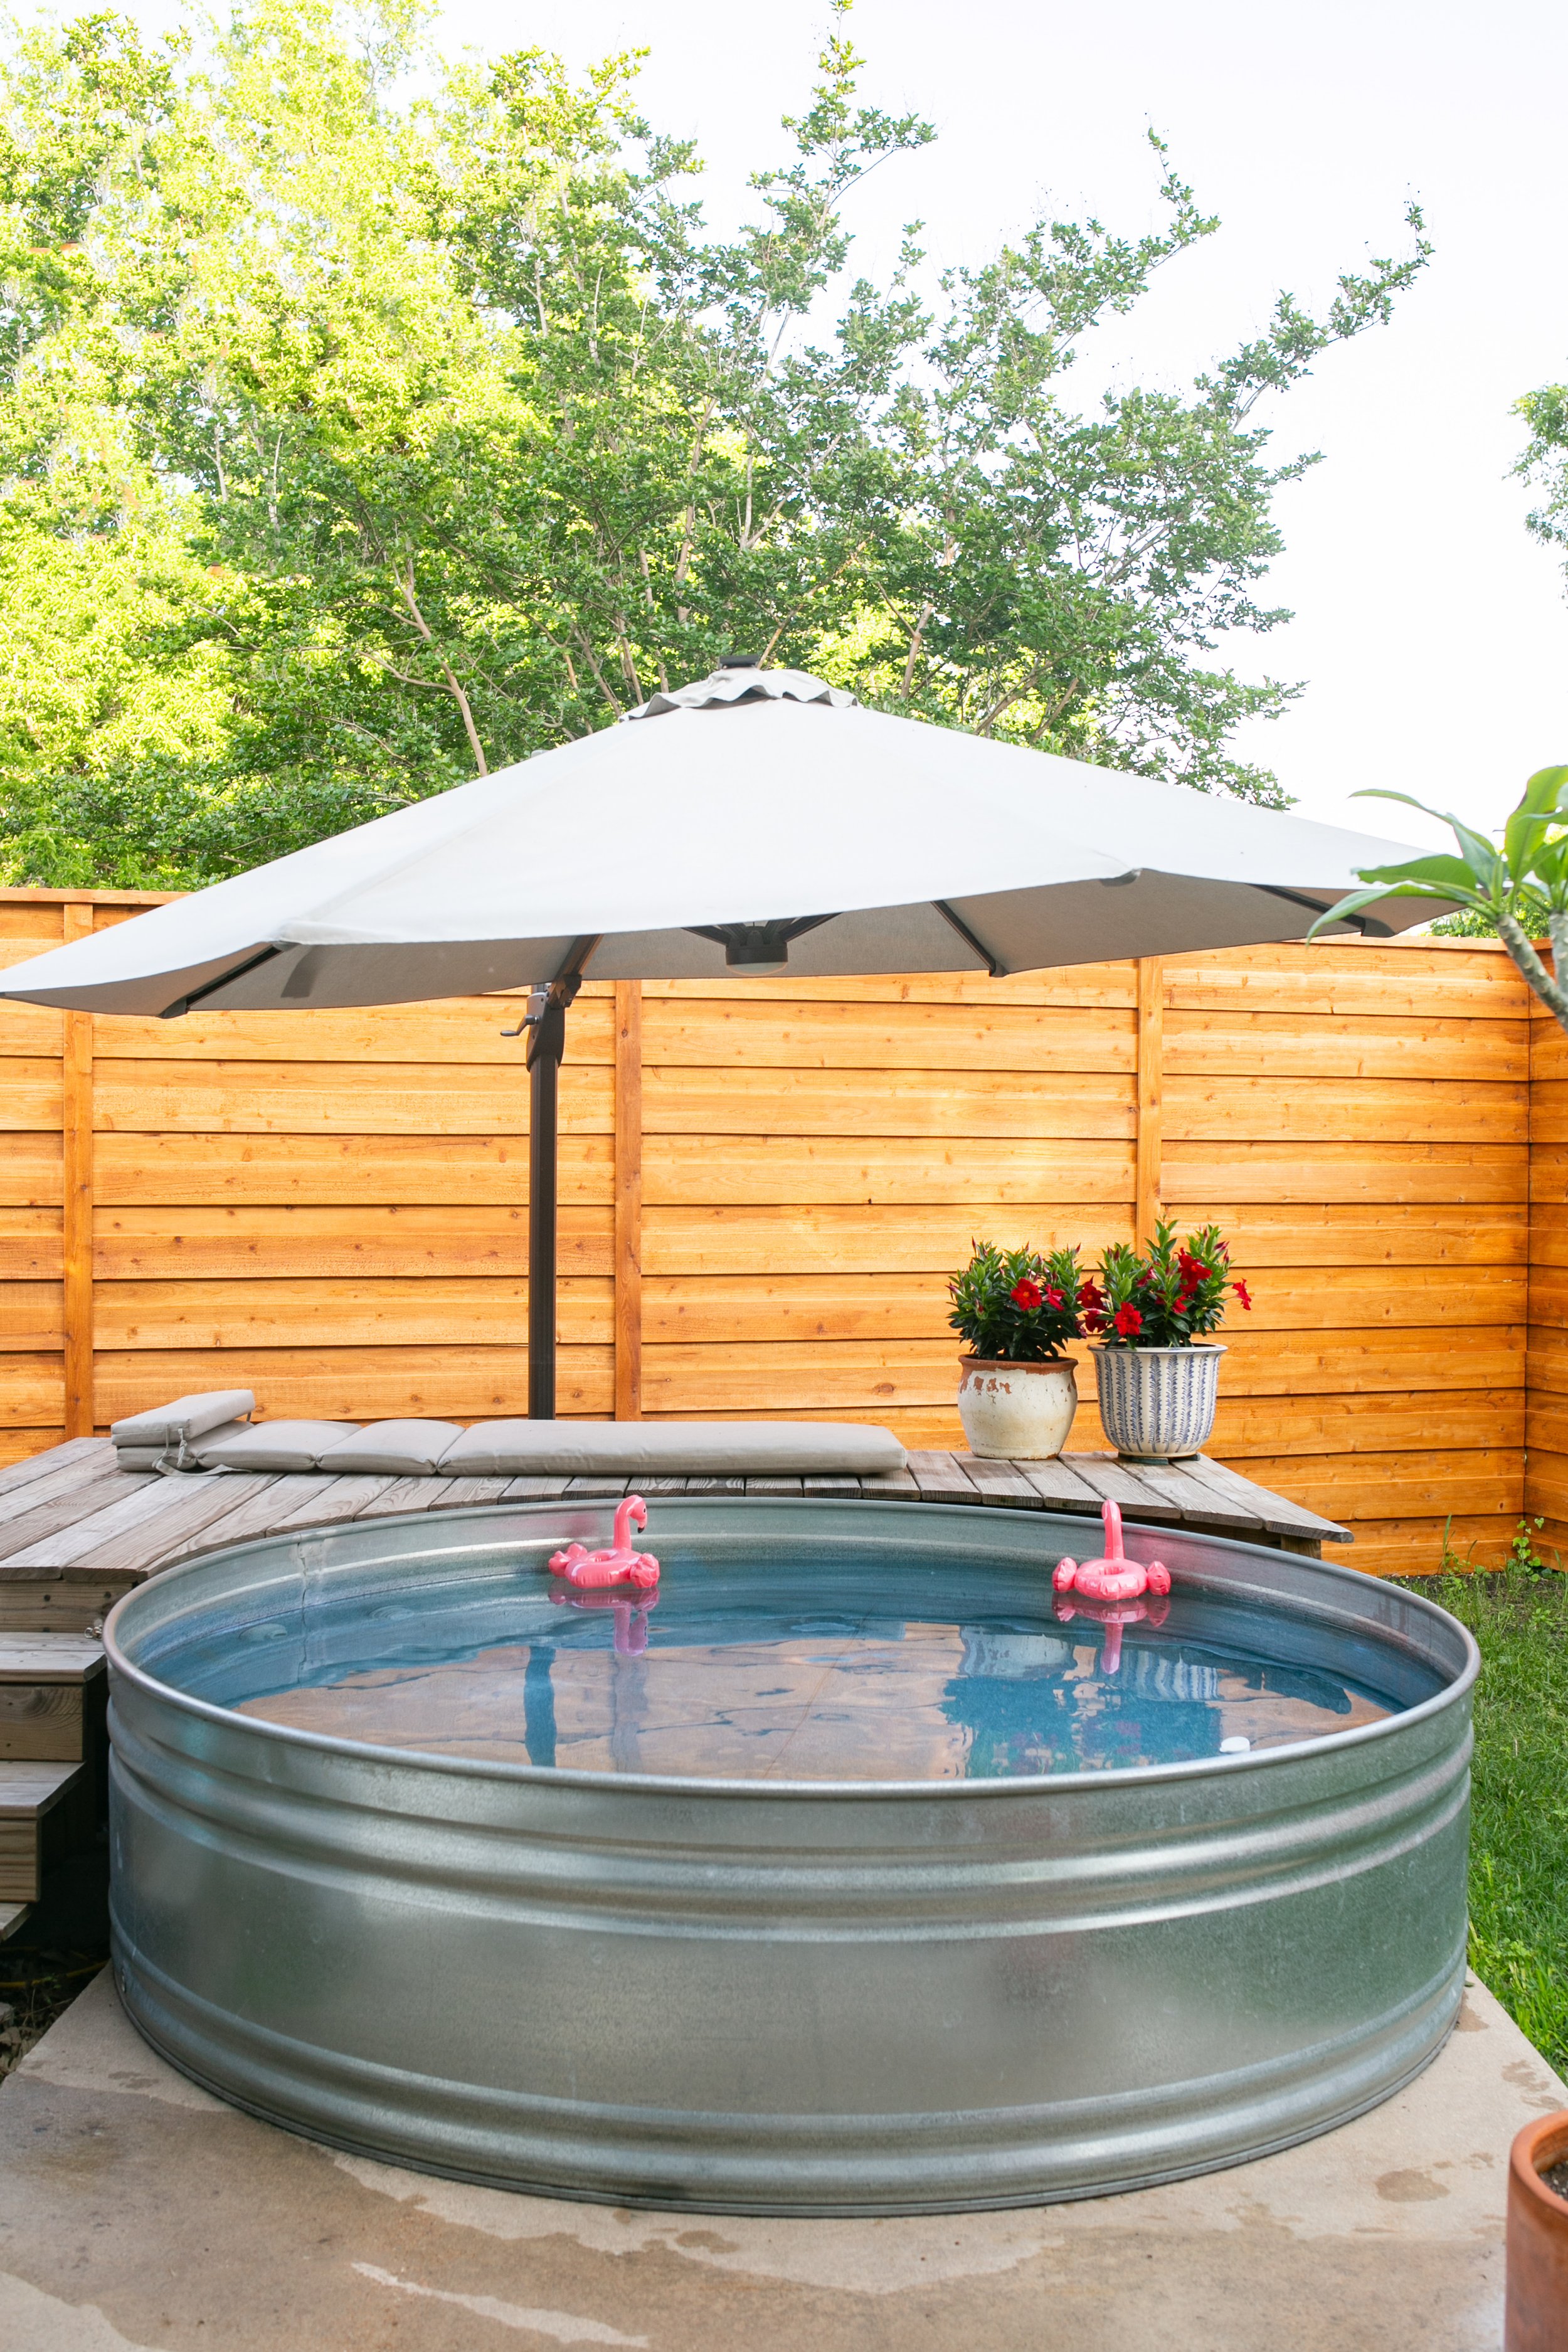
Ours has genuinely changed how we use our backyard in the summer. It cools us down, it gives us a reason to be outside, and it's become the centerpiece of our outdoor space. I've since upgraded to an 8' tank and added a deck. We still love it just as much as the day we filled it.
This guide walks you through everything: the supplies you need, how to set up the pump and filter, how to treat the water naturally, and how to prep it for spring and winter. I'll also cover the FAQs I get asked most often.
Check out the full build video before you start. It makes everything easier to follow:
Updates:
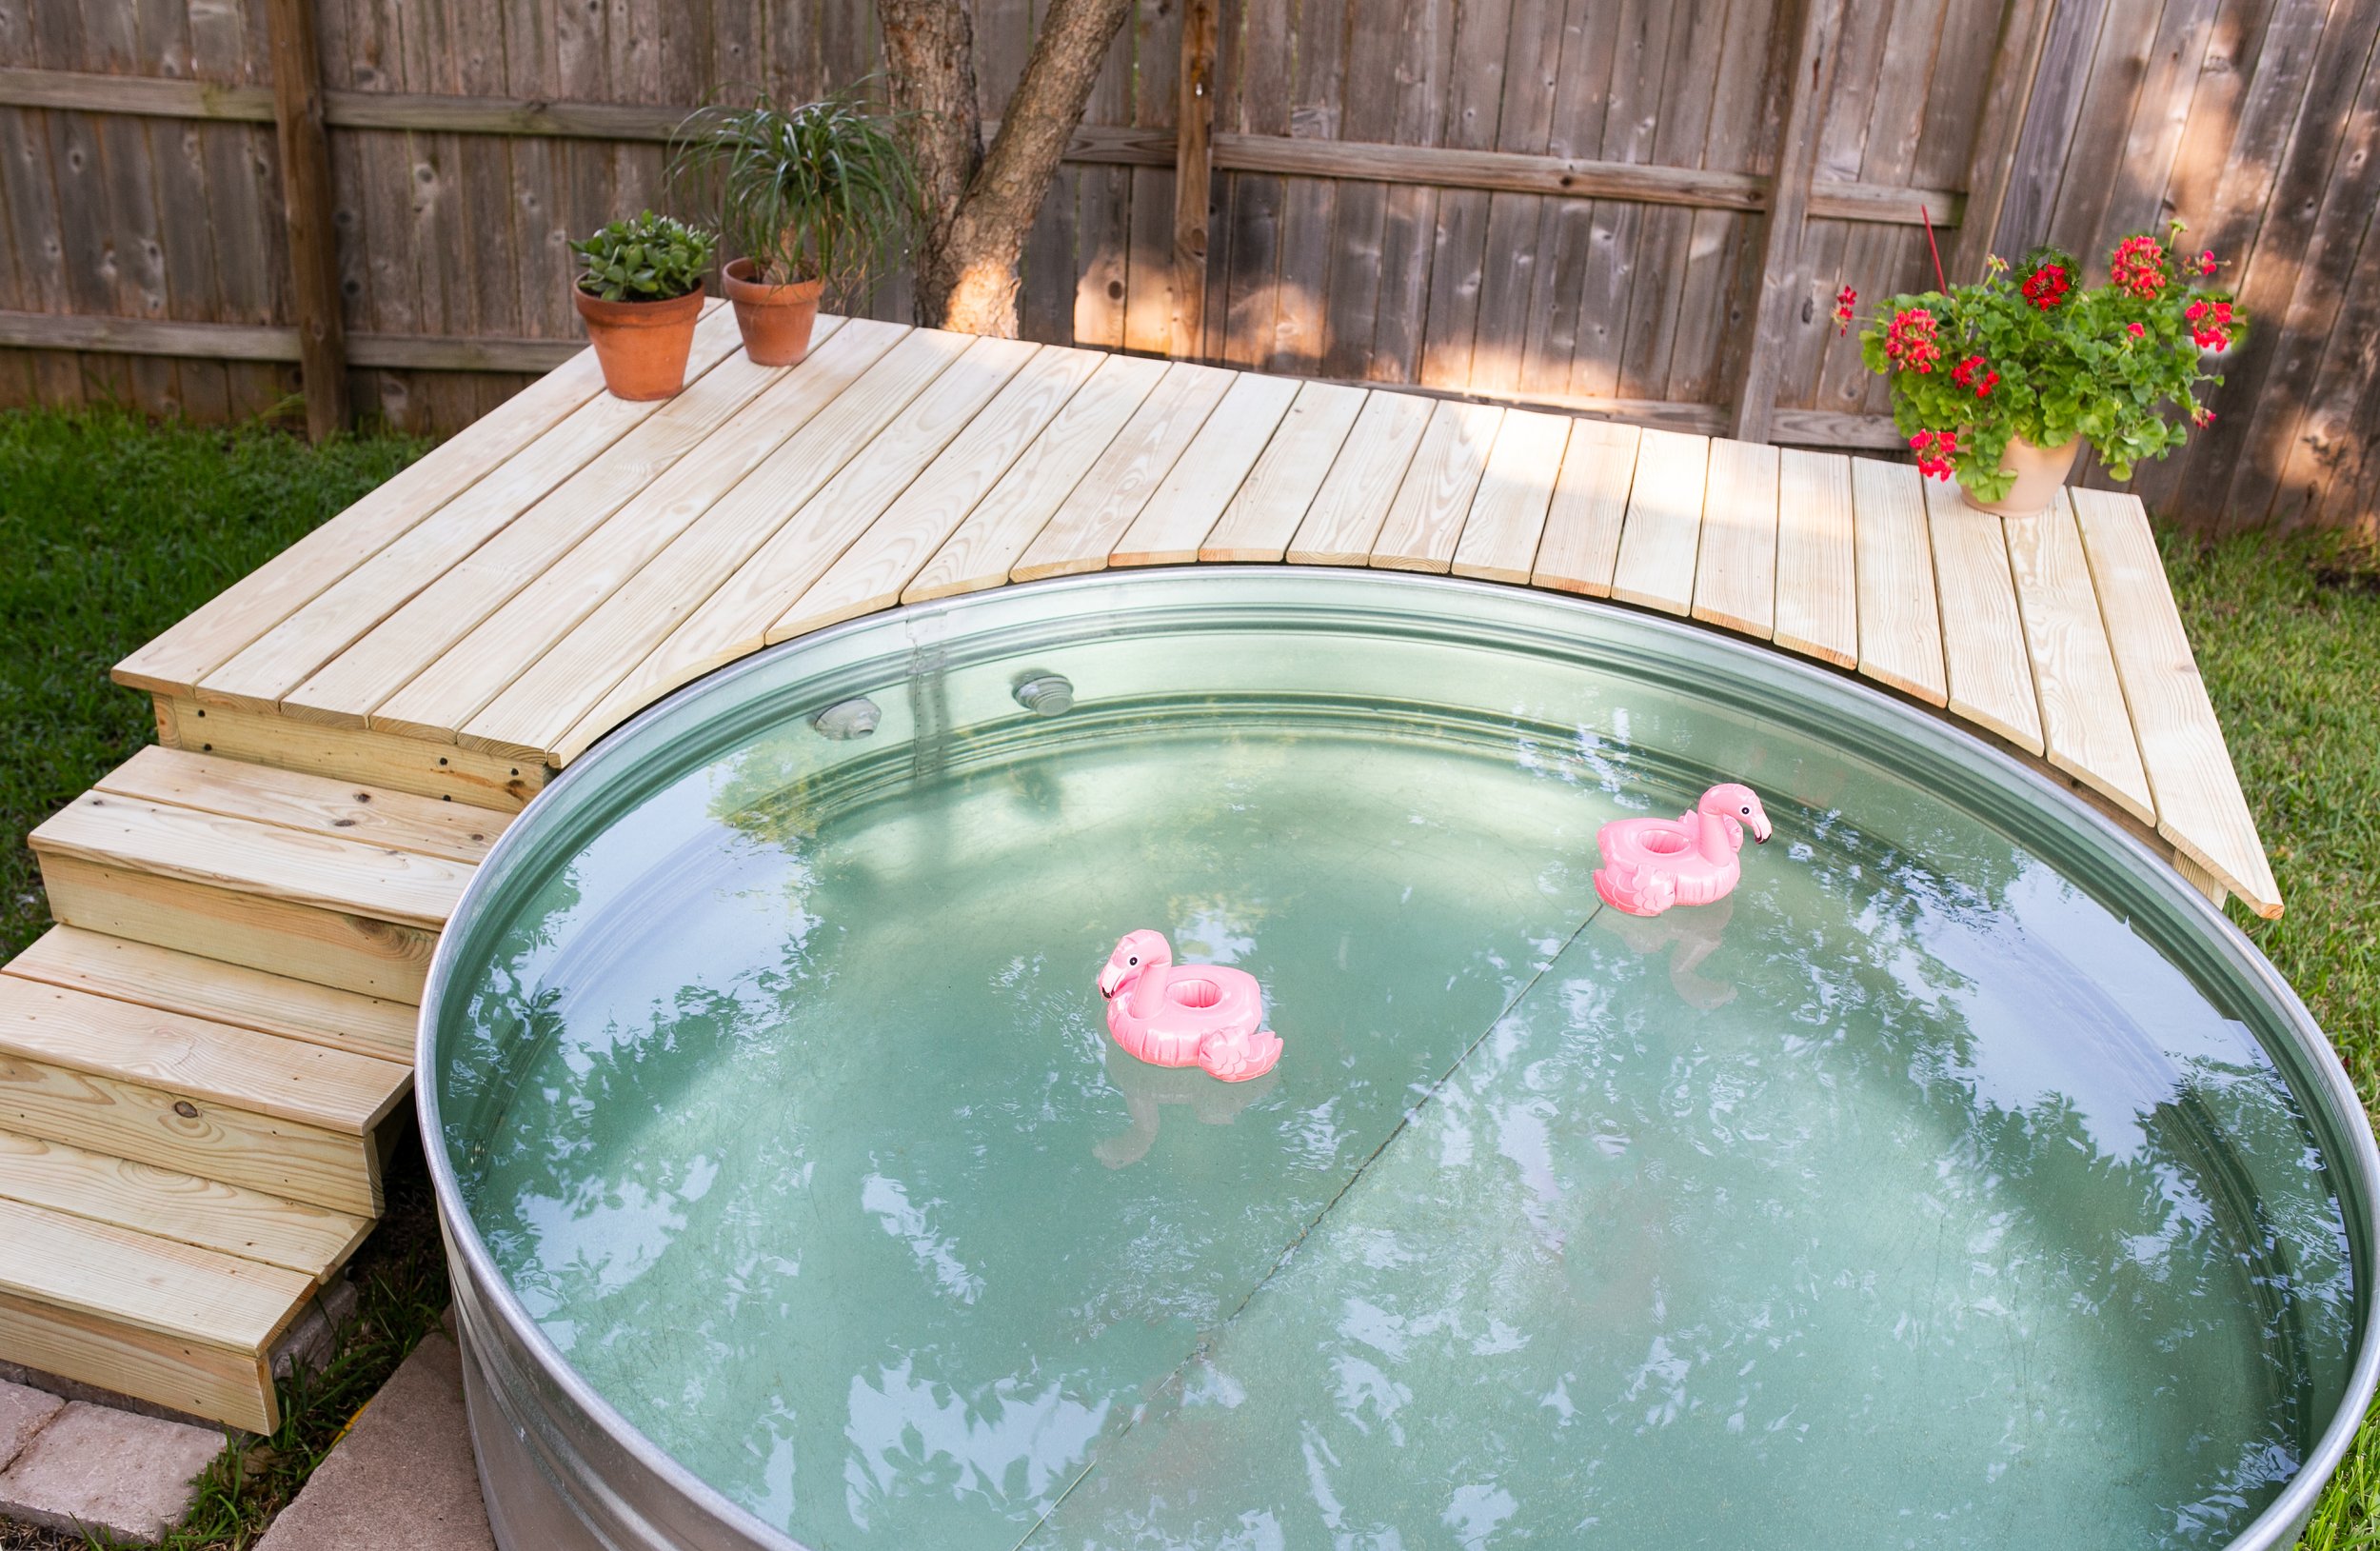
This gives you a place to sit with your feet in the water, set drinks and towels, and actually hang out around the pool. It really turns it into a full backyard setup.
Build plans available HERE!
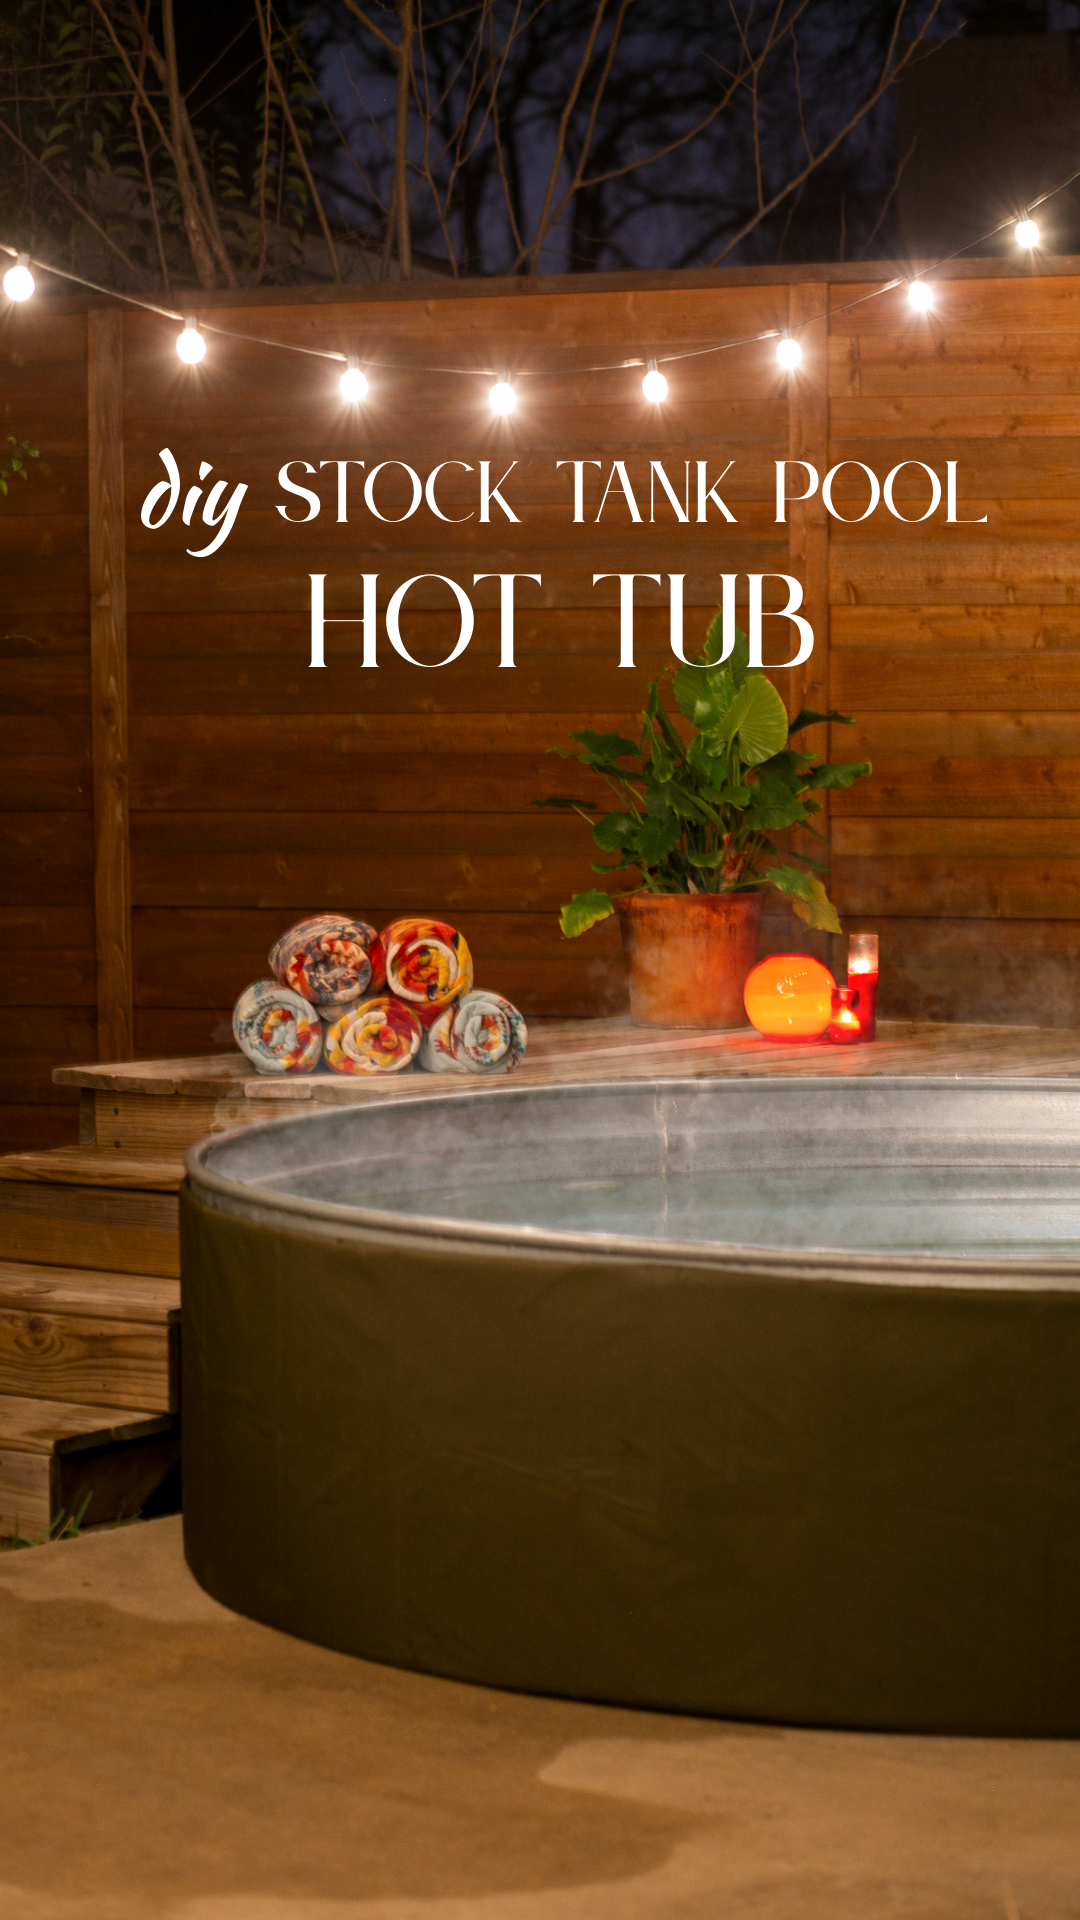
Check out how to heat the water using a propane heater, and switch back to pool mode anytime.
Finding Your Tank
You can usually find galvanized stock tanks at local livestock supply stores. I commonly see them at Tractor Supply.
Tanks typically come in 6', 8', and 10' diameters, all 2' deep. I started with a 6' tank and upgraded to an 8'. The steps are exactly the same no matter which size you choose.
Also, there are now companies selling them specifically as pools. I got my tank from a great local company called Stock Tank Love.
Ground Prep
Before anything else, you’ll need a level surface. We got lucky and had a concrete slab already in place. If you’re setting up in a yard, take the time to level and compact the ground first. A tank that’s even slightly out of level will be obvious once it’s filled and much harder to correct later. The closer you can get it now, the happier you’ll be with the finished result.

What You'll Need
The Pump + Filter System
I recommend a sand filter over a cartridge filter. It requires far less maintenance, you only replace the media every few years, and the overall cost is lower long term.
Pool Filter Pump — good entry option
Waterway TWM 30-s Sand Filter Pump — the one I now use and recommend; bigger and better
Pump Timer — run the pump on a schedule so you're not thinking about it
Installation Hardware
Plunger Valves (x2) — lets you change hoses/filters without draining the pool
2-3/4" Hole Saw — make sure to also get an arbor if you don’t have one

Filter Media + Water Treatment
Glass Filter Media — I use this instead of sand; filters better and lasts longer
Pre-Fill Water Filter — helps filter out calcium, VOCs, and hard water when filling
35% Food Grade Hydrogen Peroxide — my water treatment of choice (more on this below)
Maintenance
Add-Ons
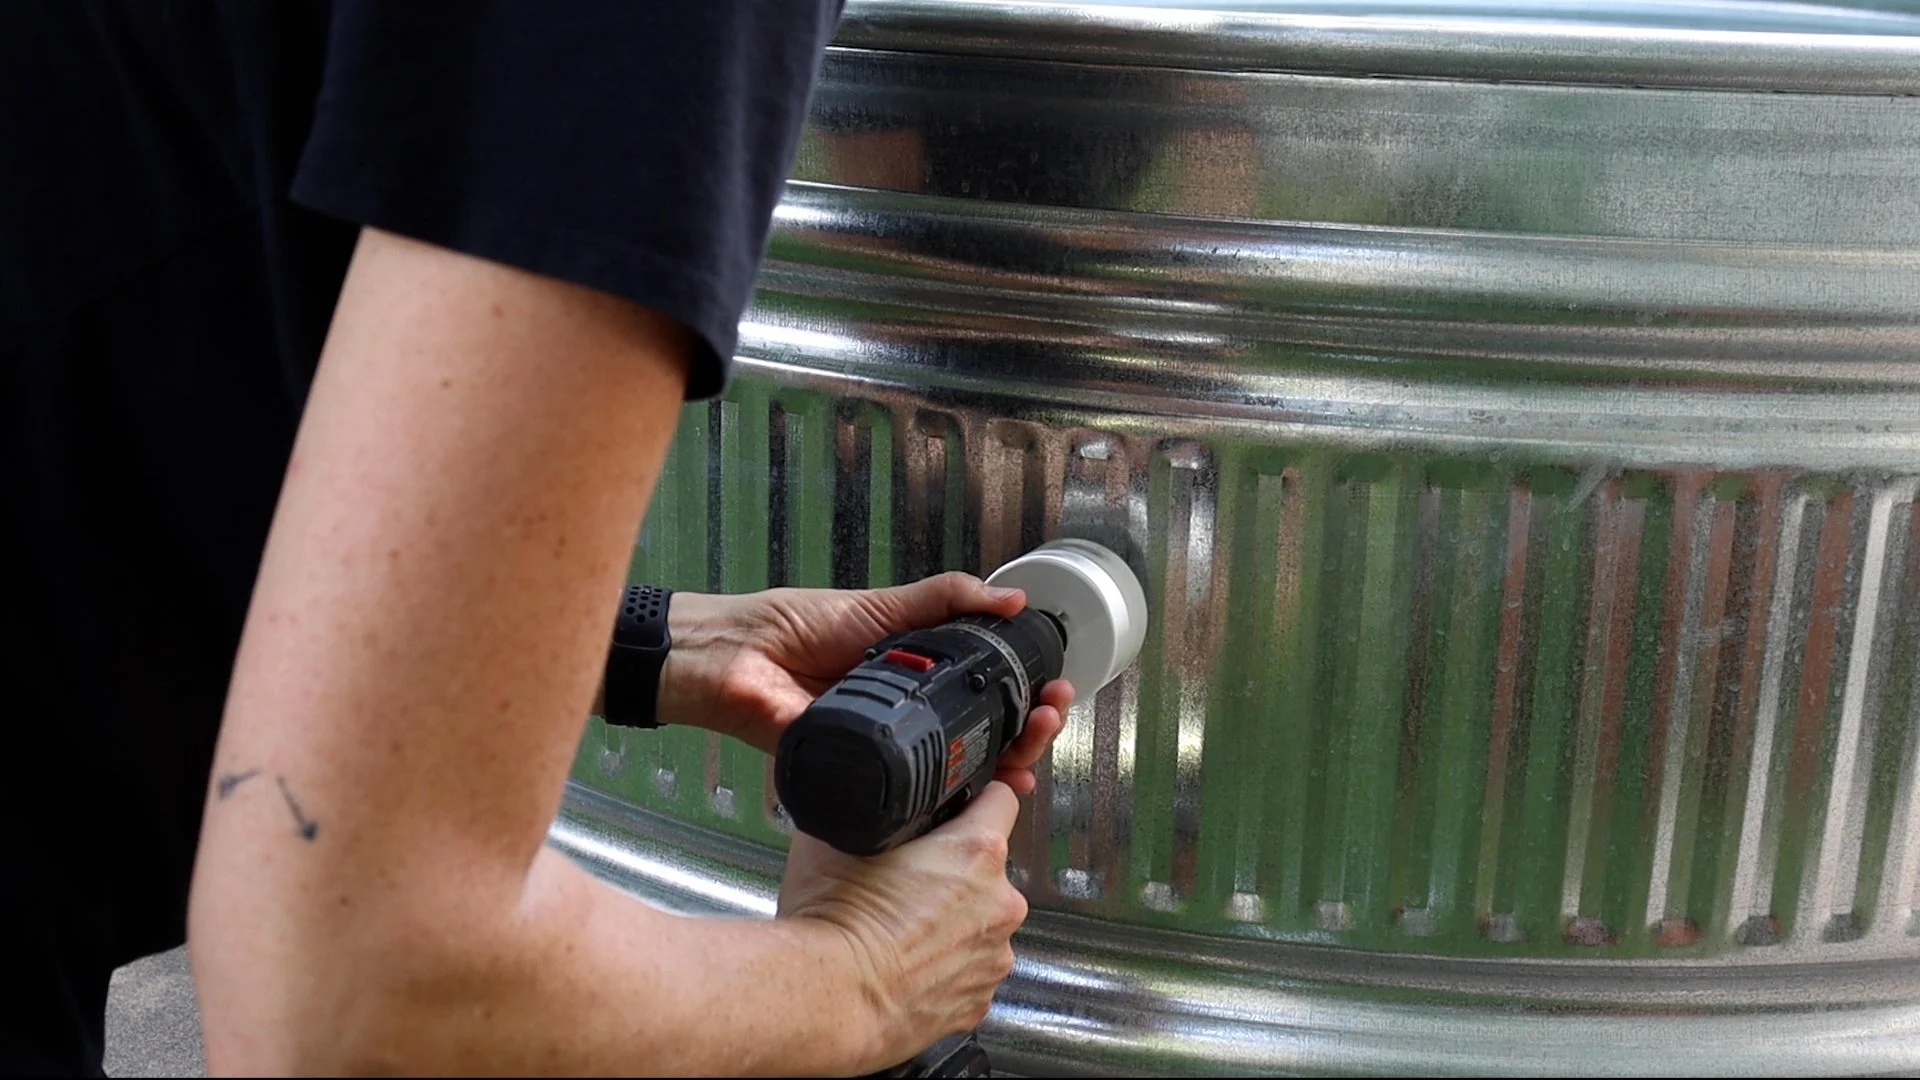
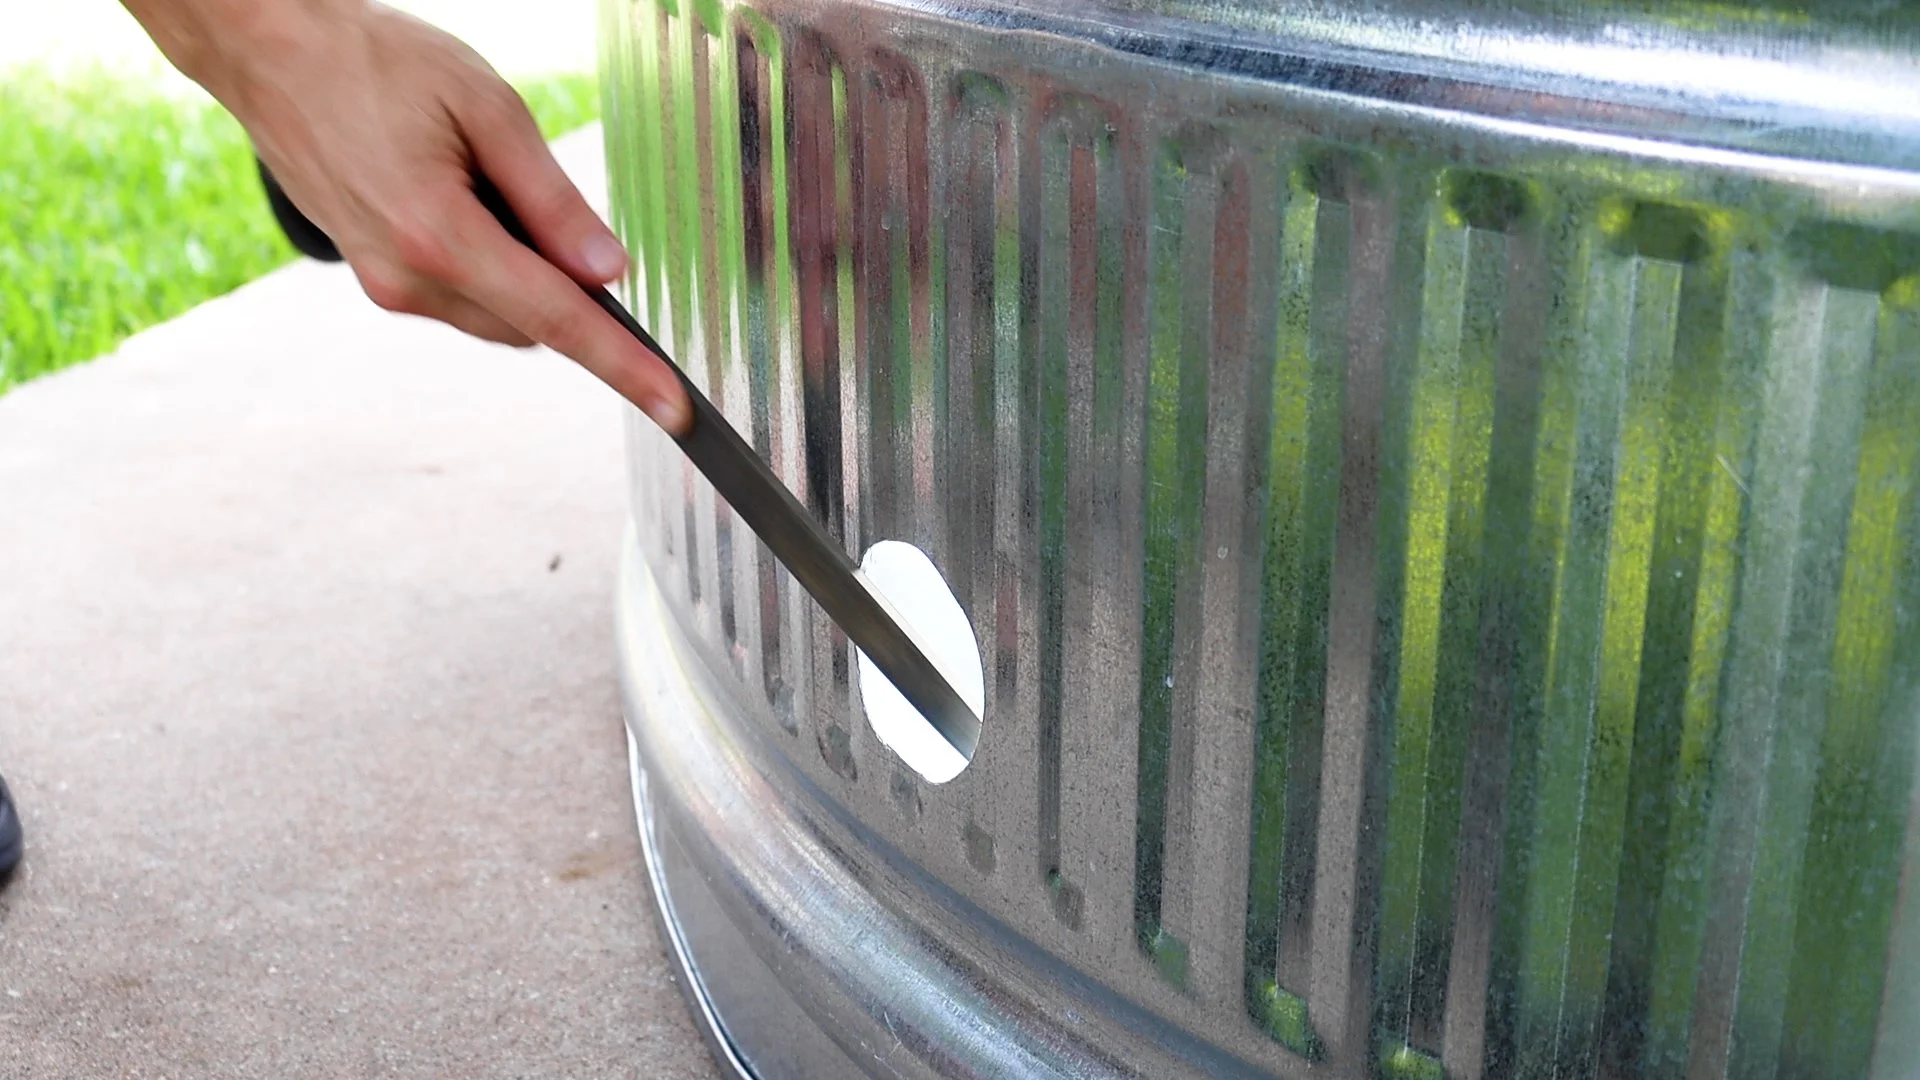
Step 1: Drill the Holes
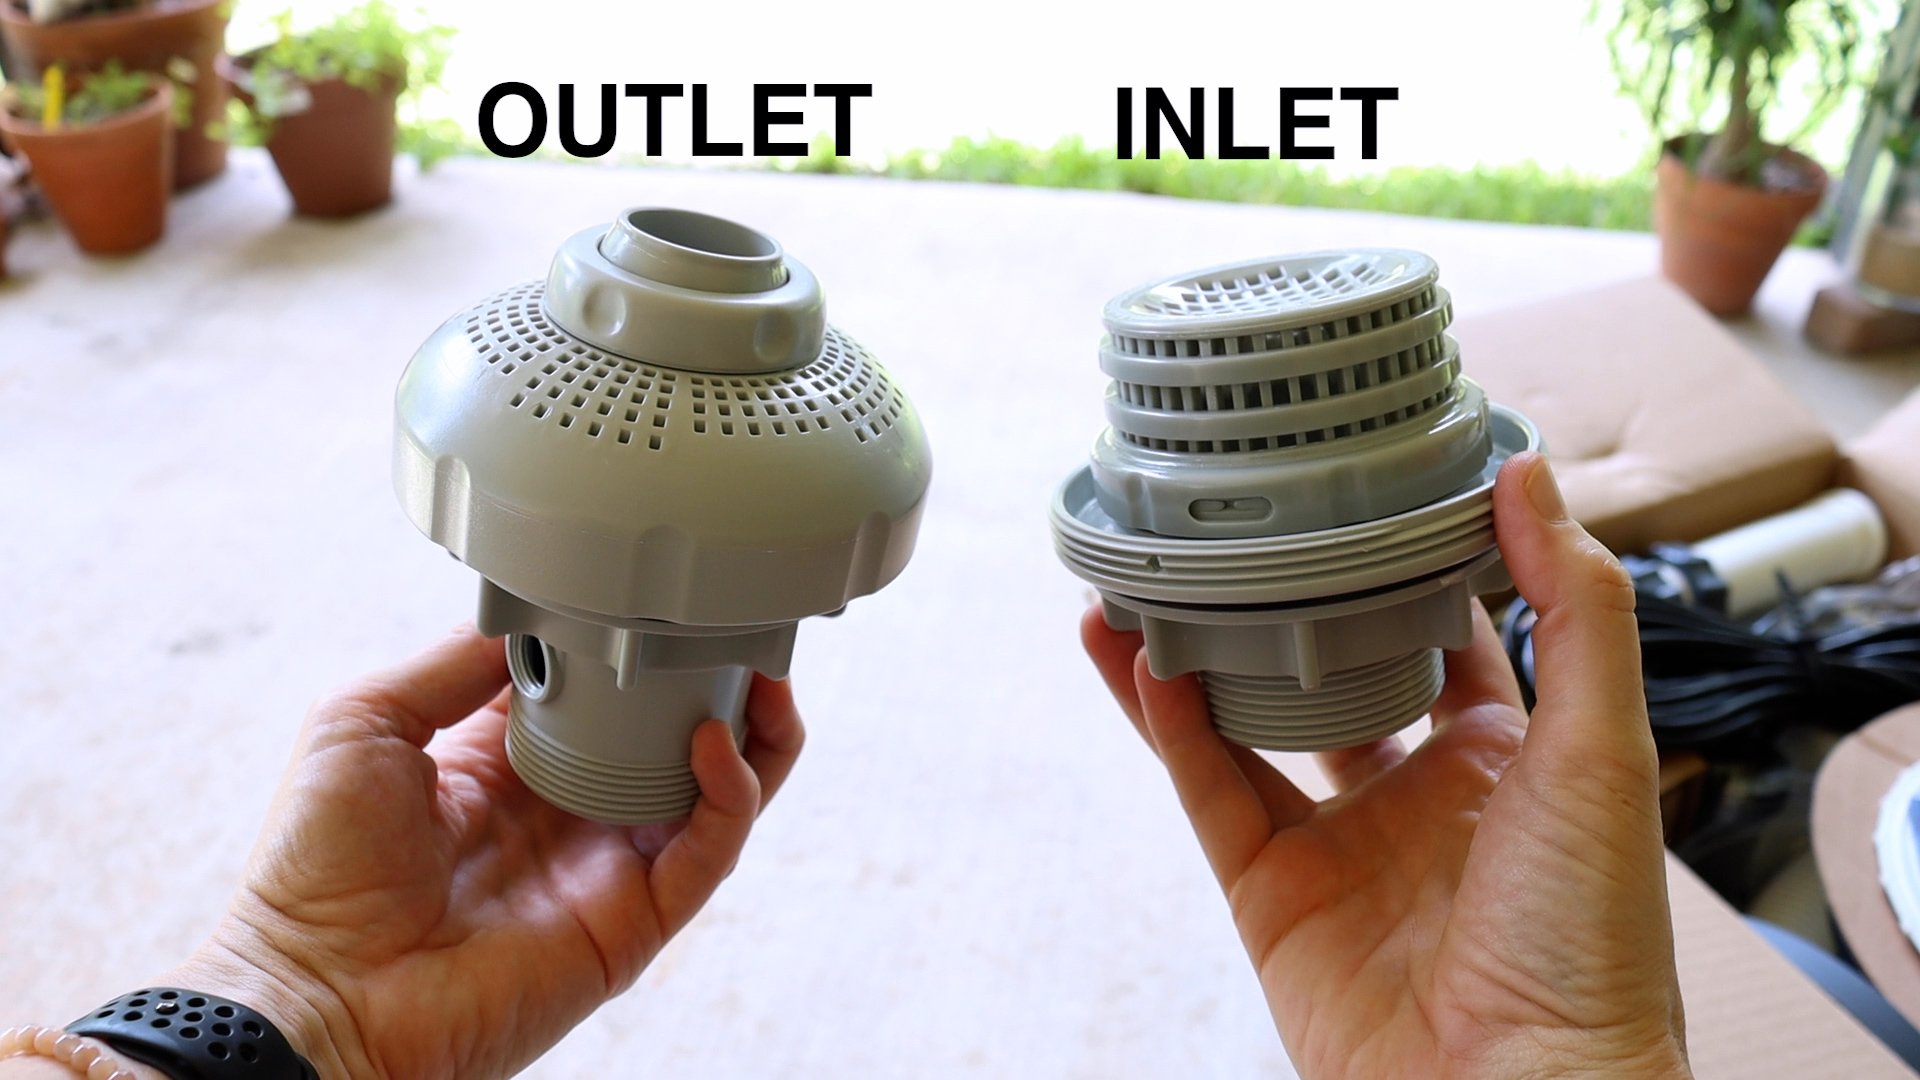
Start by drilling a hole for the outlet valve using your hole saw. Pick your spot carefully. The larger part of the valve needs to clear the lip on the inside of the tank, so don't place it too high.
Then drill a second hole for the inlet valve, slightly lower than the outlet, also making sure to clear the lip.
Once both holes are drilled, file down any sharp edges with a metal file and clean up the metal shavings thoroughly before moving on. You don't want those in your pool water.

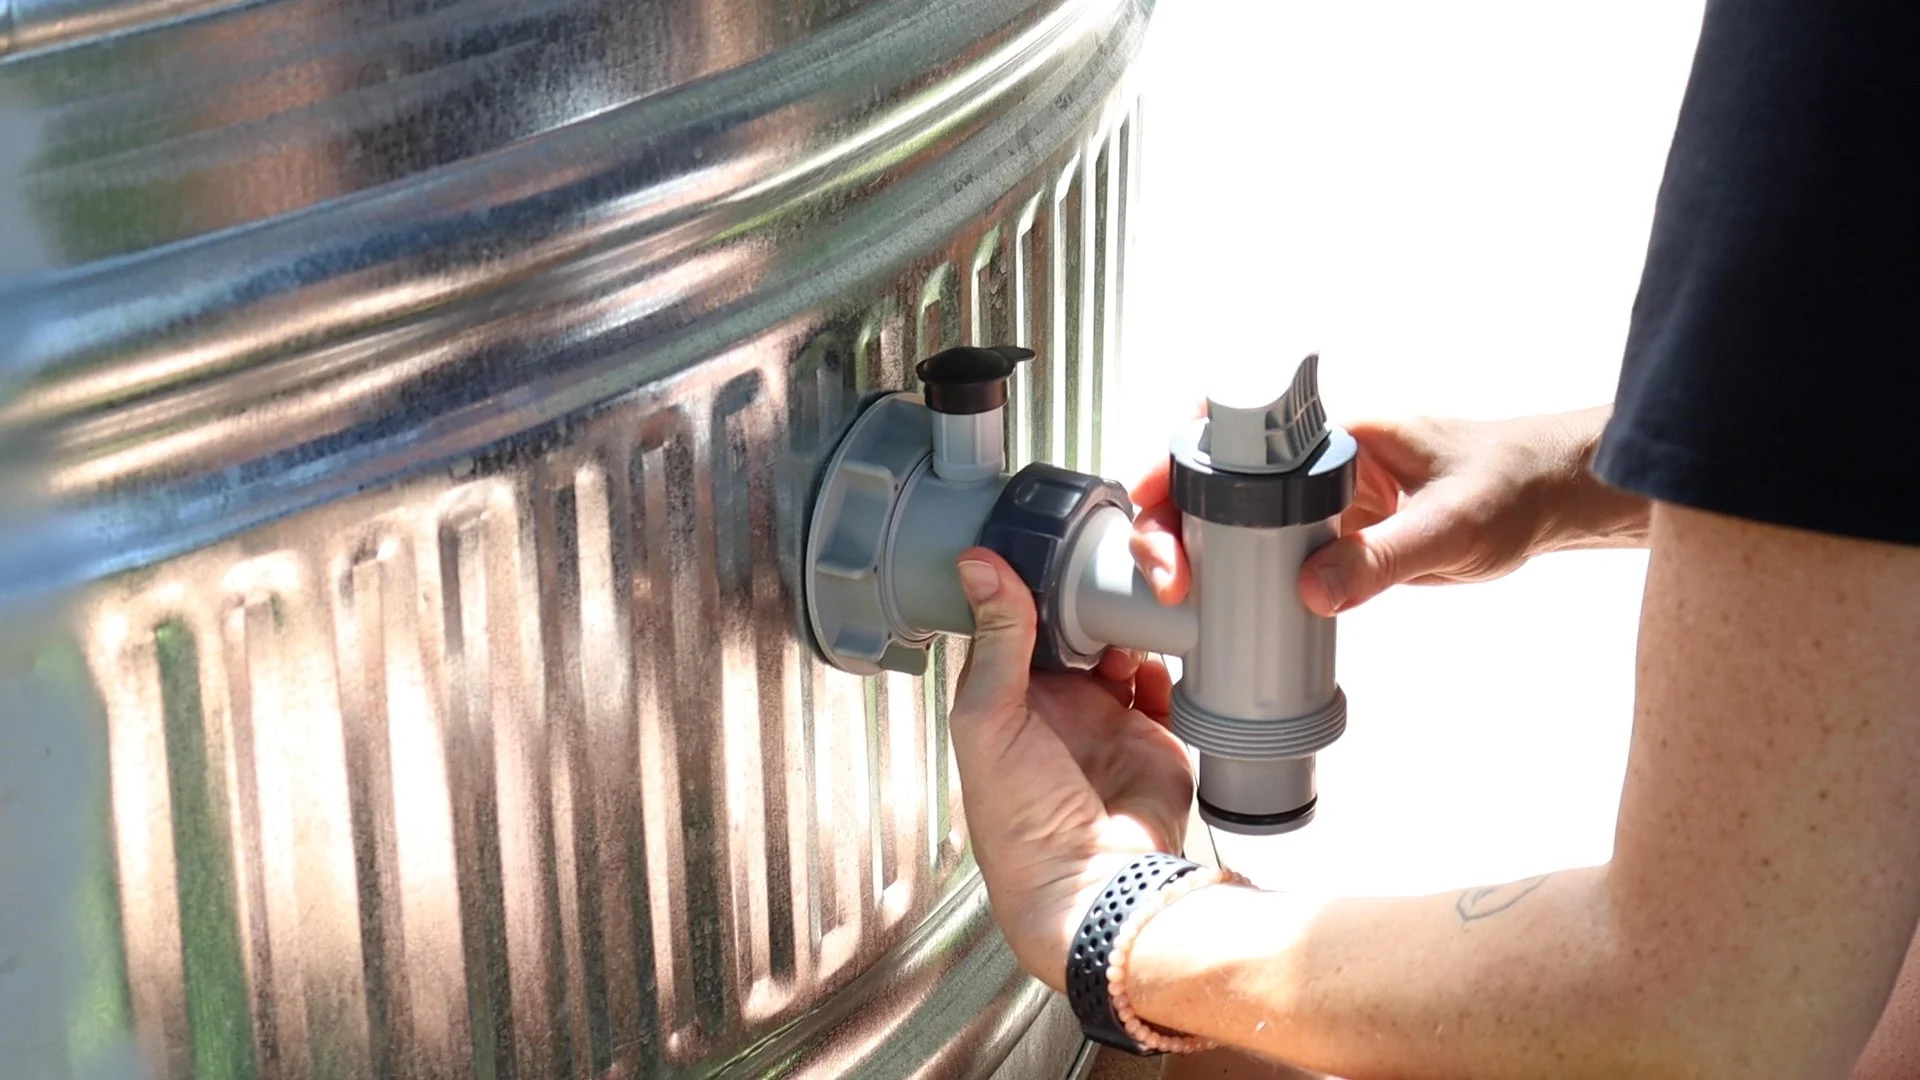
Step 2: Install the Valves
Wrap plumbing tape around the threads of both valves for an extra layer of leak protection.
Load up your marine grade sealant and apply it around the inside of the outlet valve fitting, then place it into the higher hole and let the sealant squeeze out and fill in around the edge. That squeeze-out is what creates the watertight seal. Screw the nut on tight, keeping the air hole facing up, then attach the air jet valve piece that comes with the outlet.


Repeat the same process for the inlet valve in the lower hole. Any sealant squeeze-out can be smoothed by dipping your finger in water and running it around the edge.
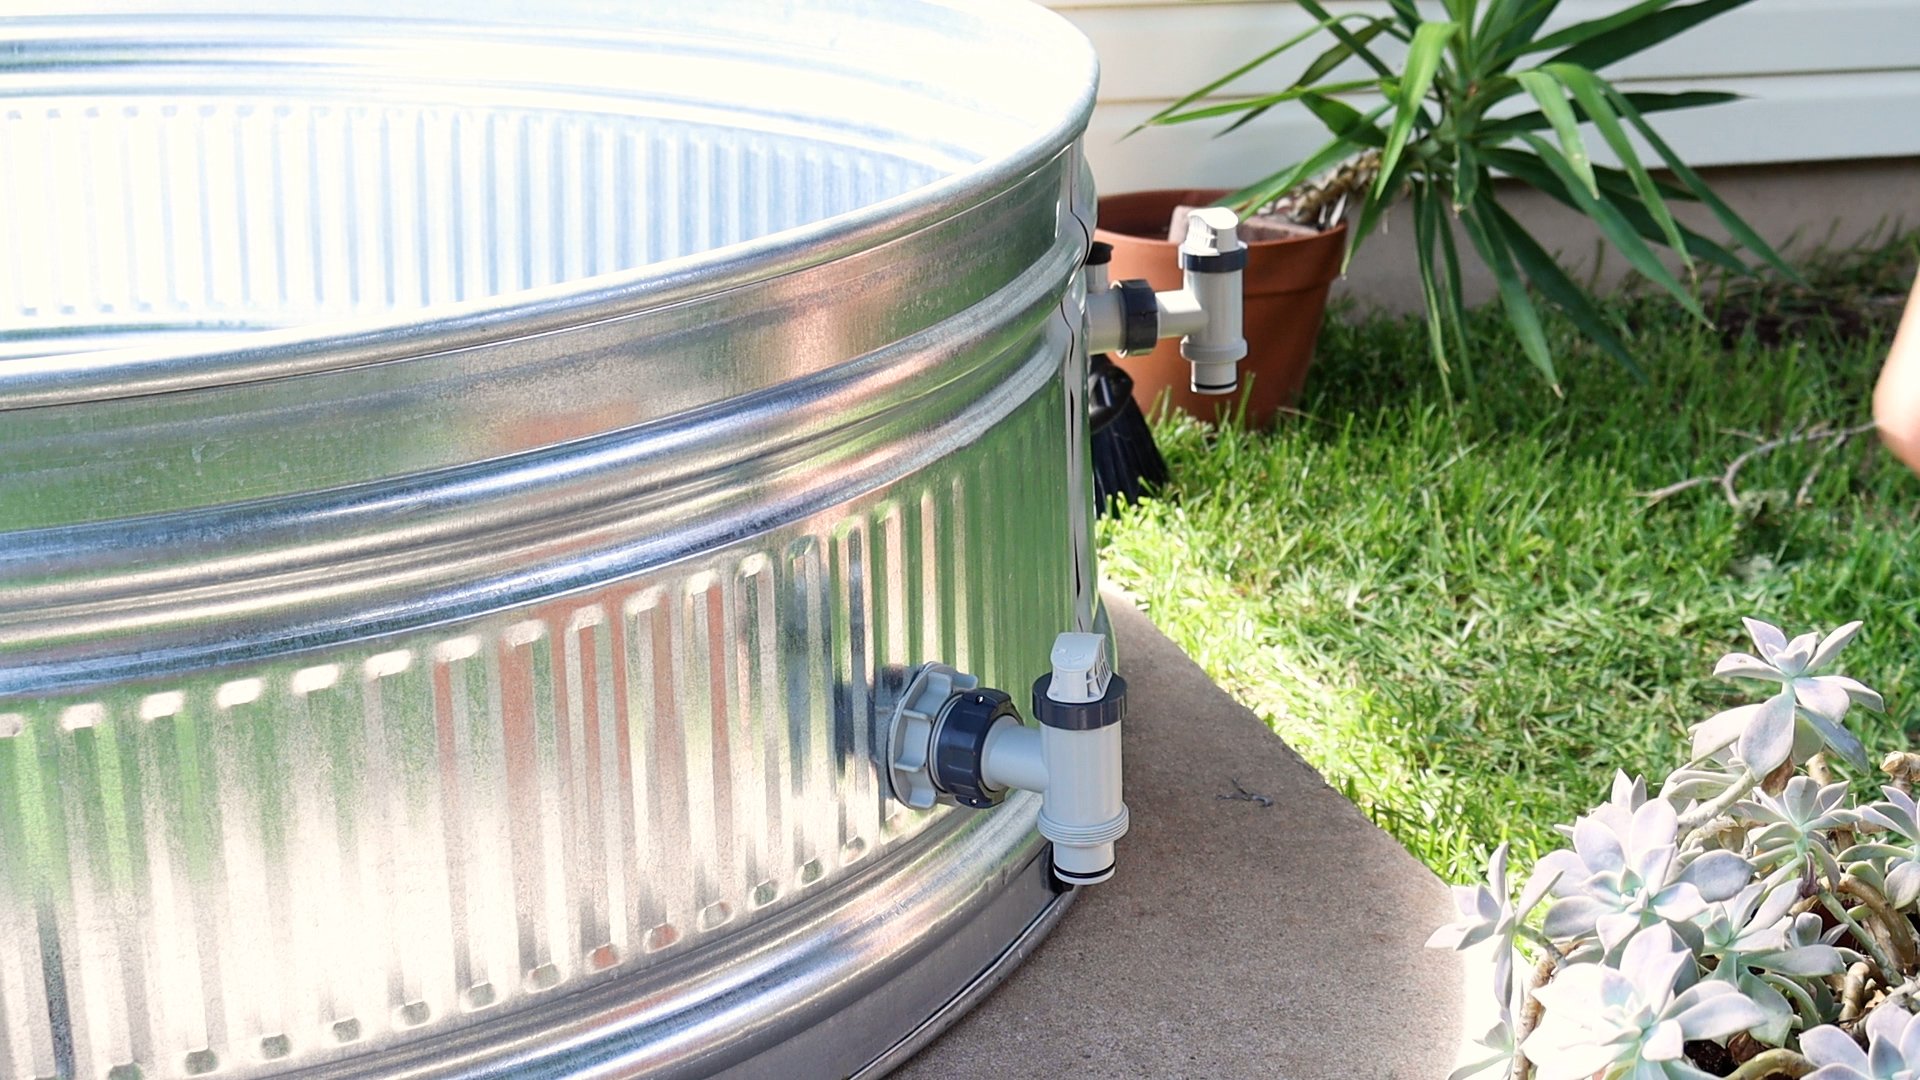
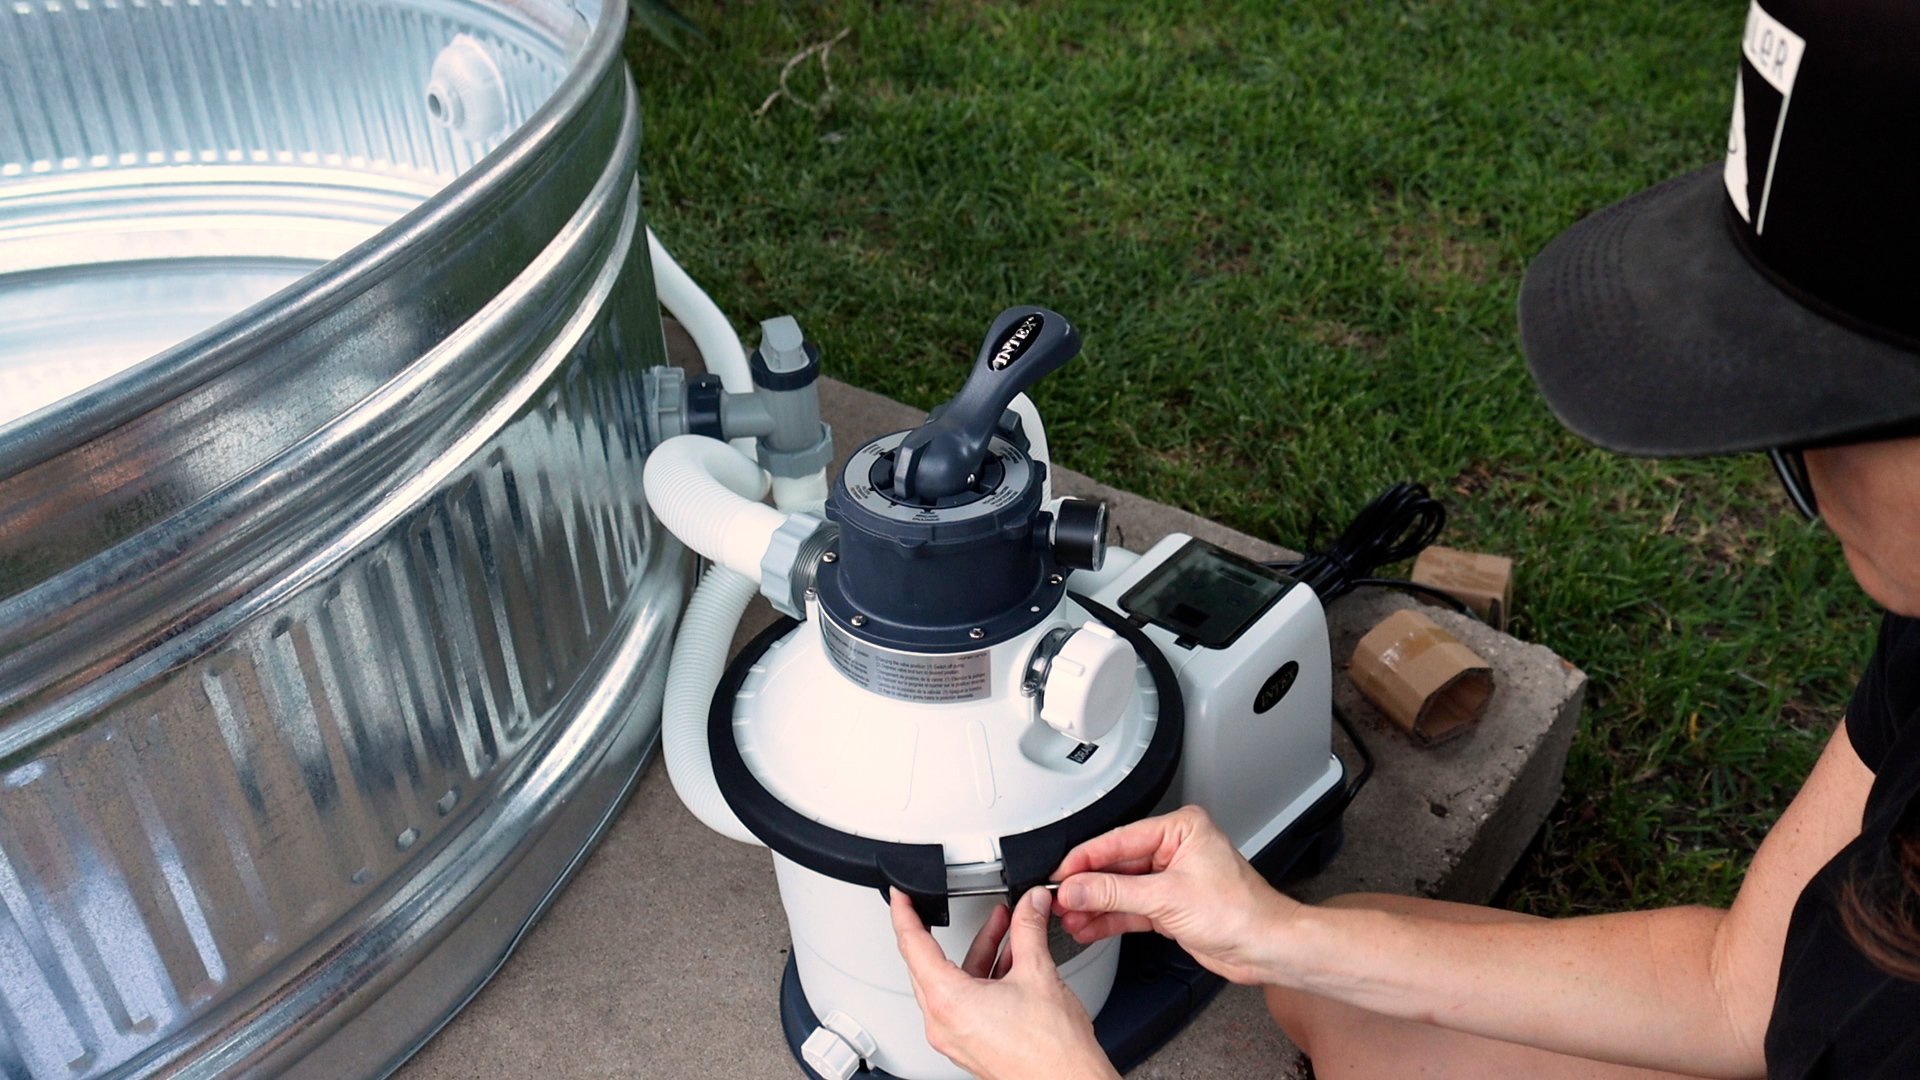
Step 3: Install the Plunger Valves
Attach the two plunger valves to the inlet and outlet. They let you shut off water flow to the hoses so you can change filters or do maintenance in the future without draining the entire pool. Worth doing right from the start.
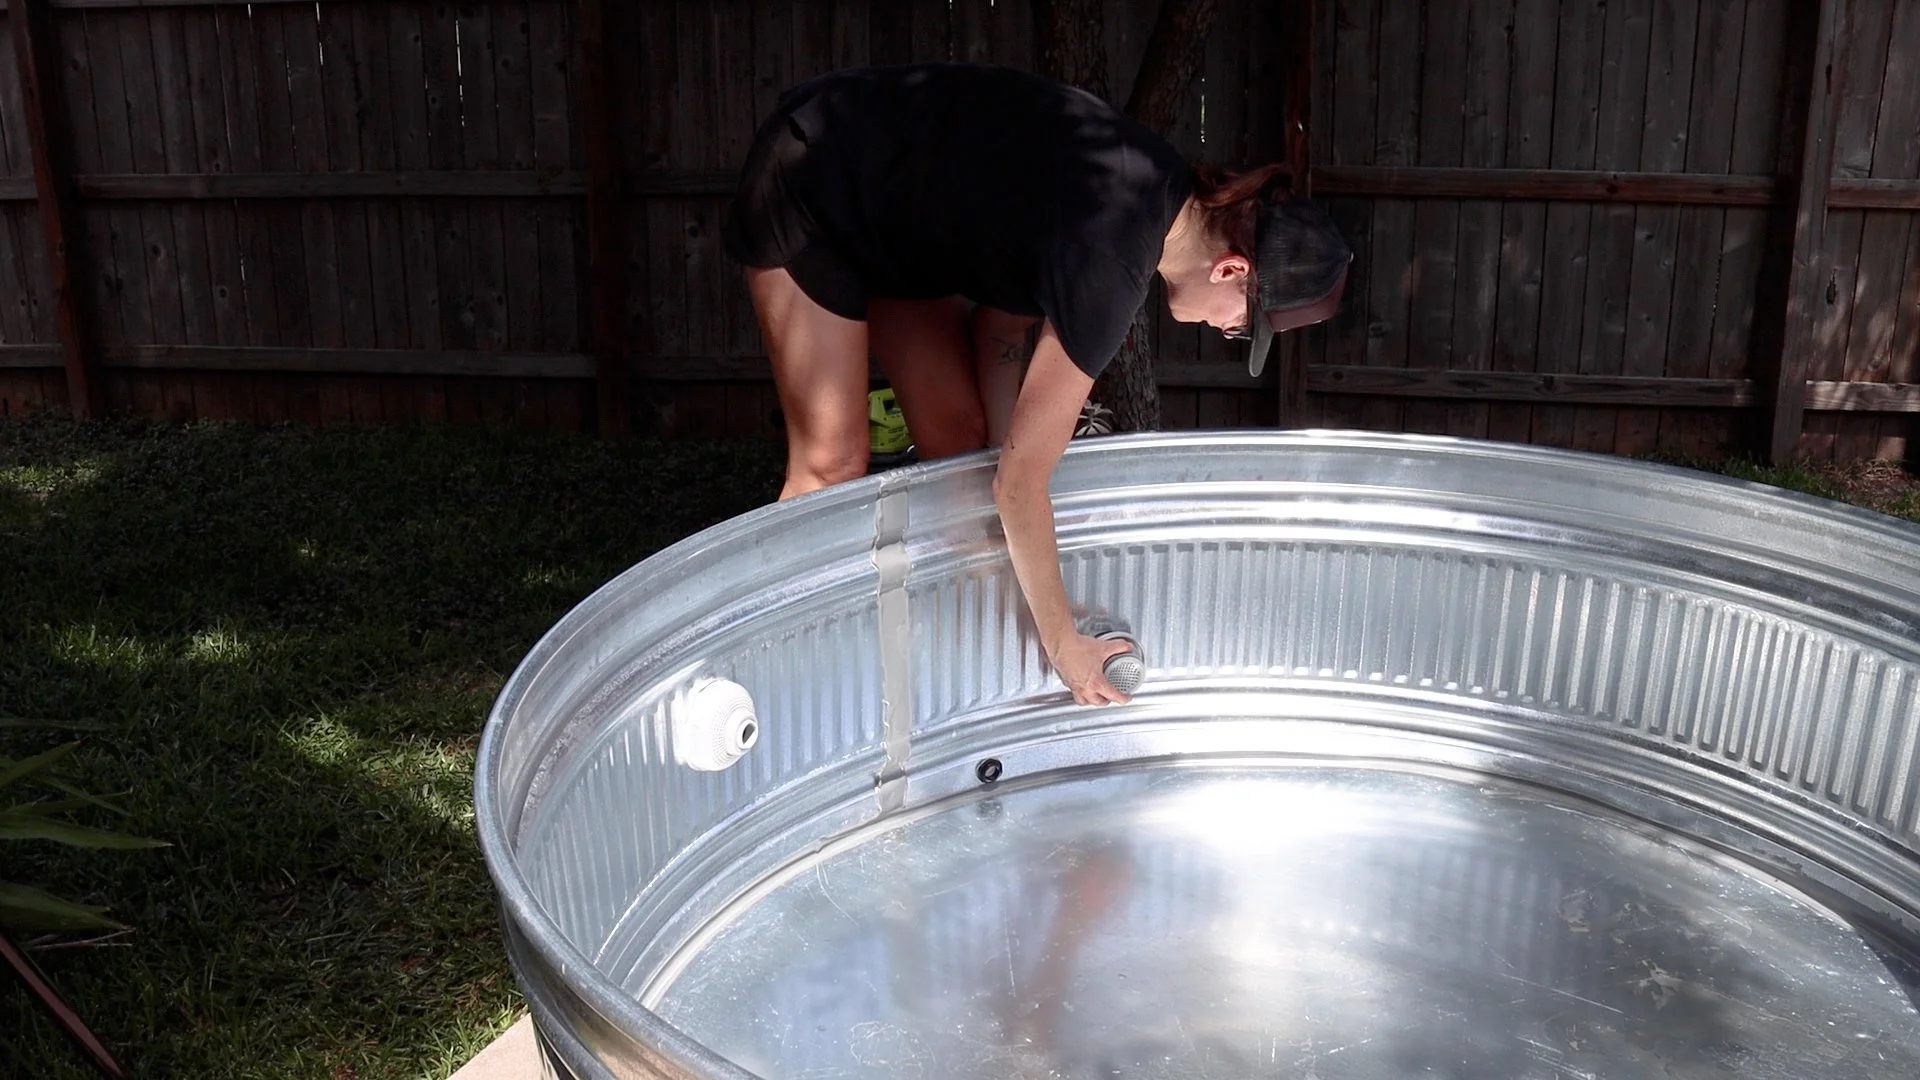
Step 4: Set Up the Filter
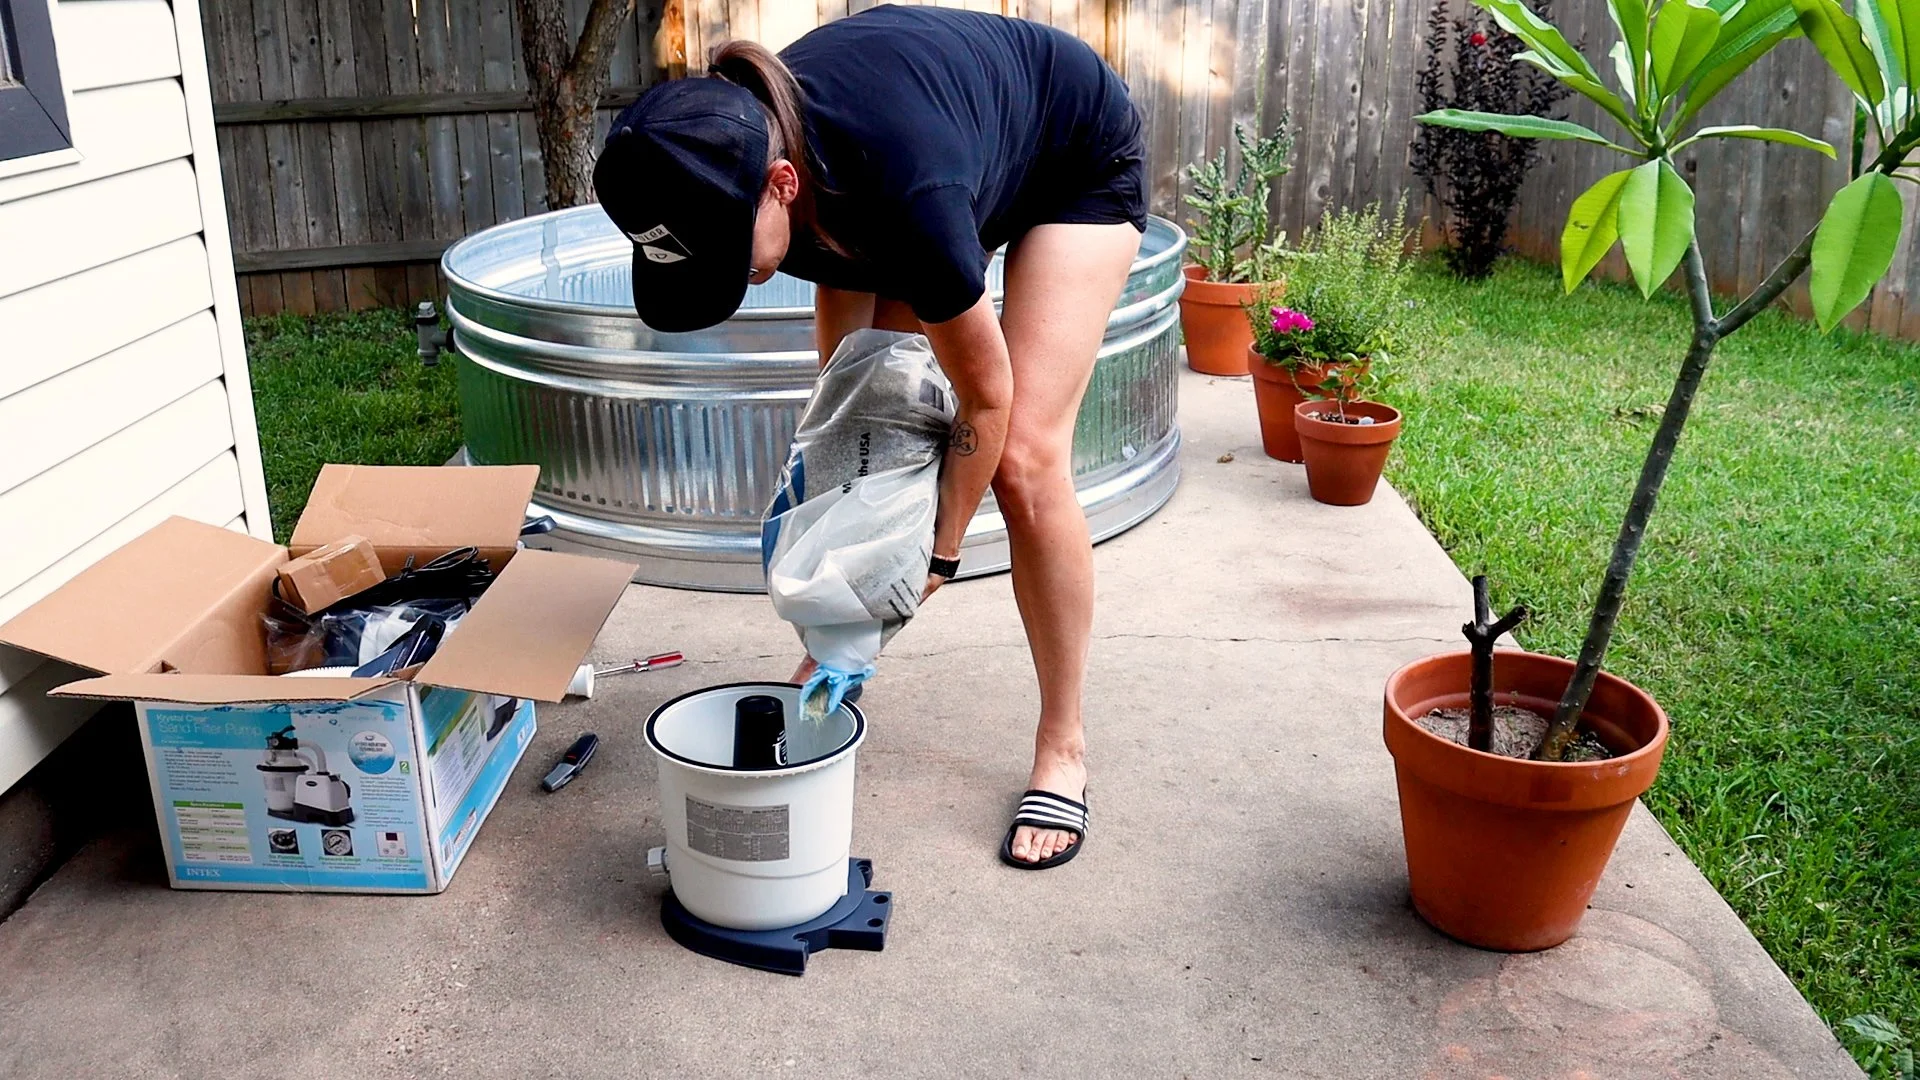
Place a cup over the inner hole of the filter tank to prevent media from falling into the center tube, then pour in your glass filter media up to the fill lines marked on the tank.
Attach the hoses to the plunger valves and the pump, and secure the collar on the tank. Your pump's instruction manual will show you the correct hose placement. Follow it closely, or search YouTube for a setup video specific to your pump model. My video tutorial shows this process well.
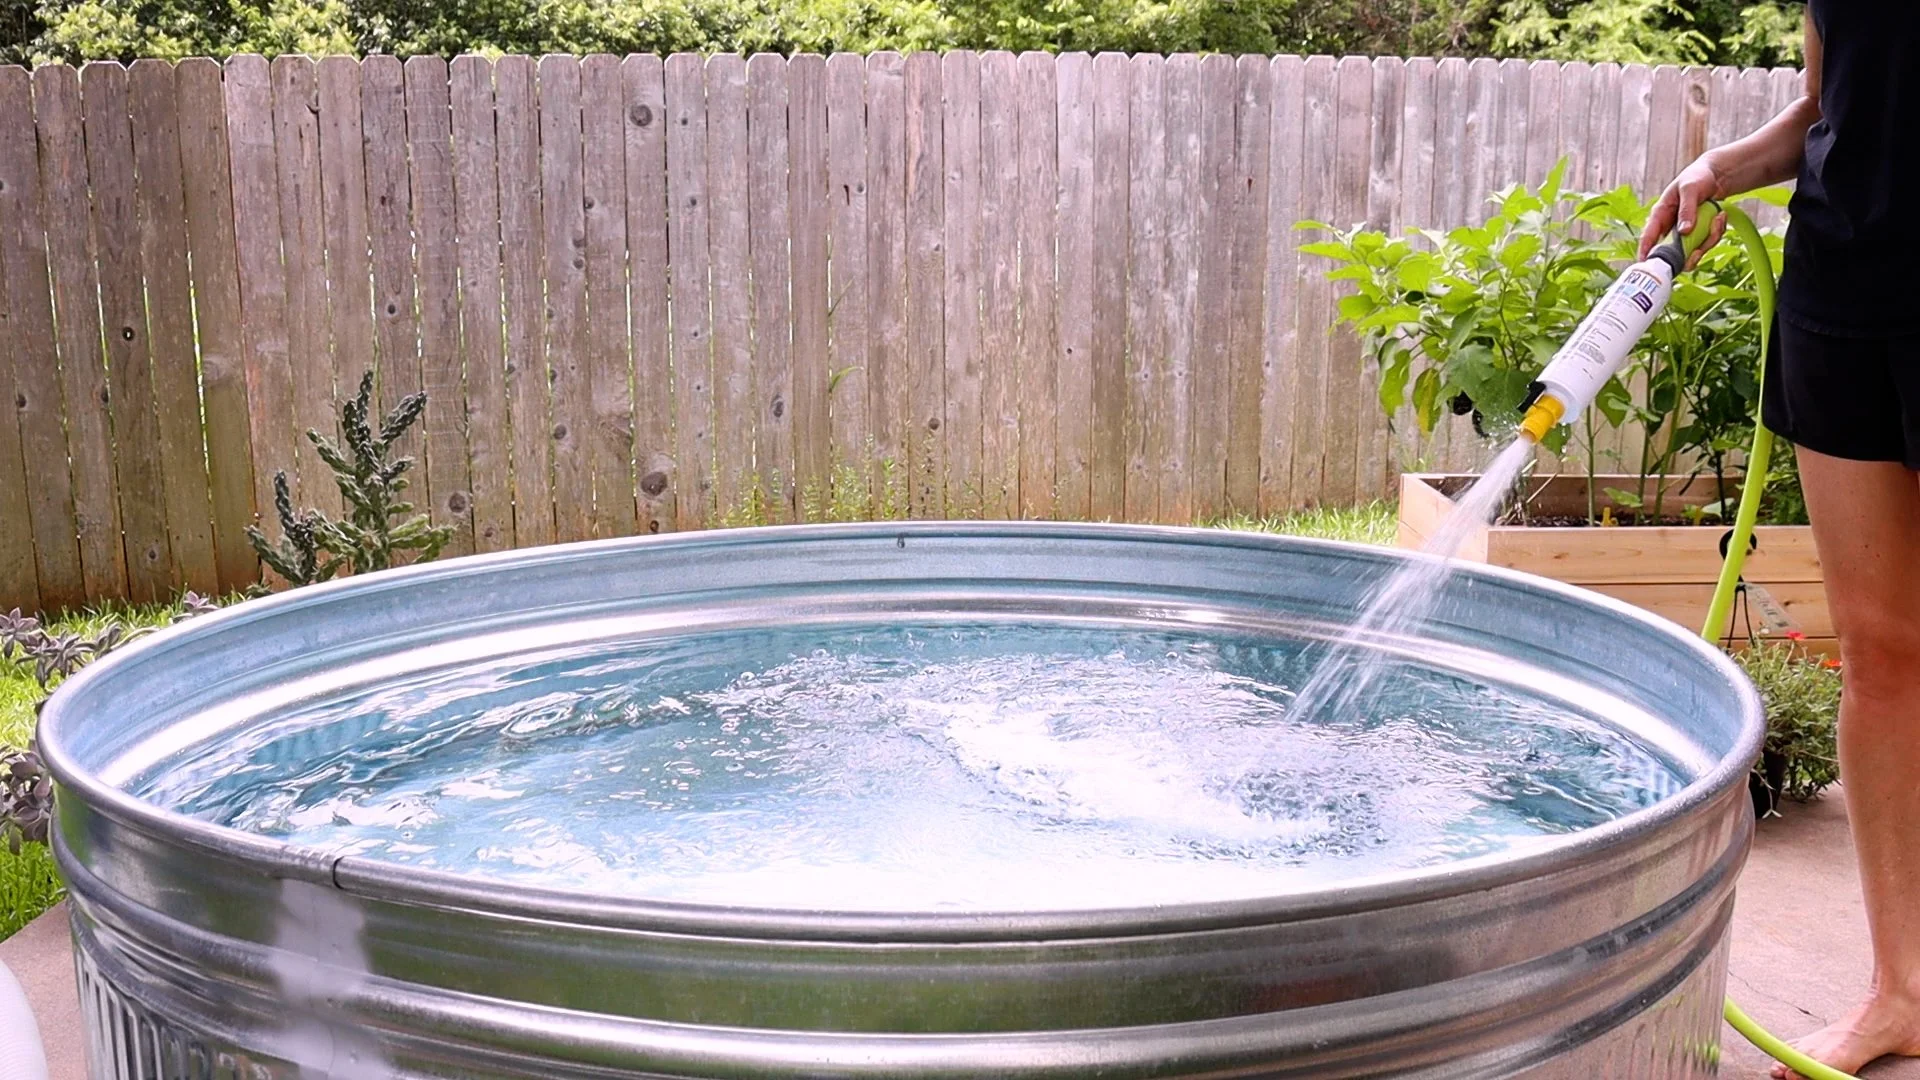
Step 5: Fill and Treat the Water
Run your pre-fill water filter on the hose while filling to help filter out calcium, VOCs, and hard water from the start.
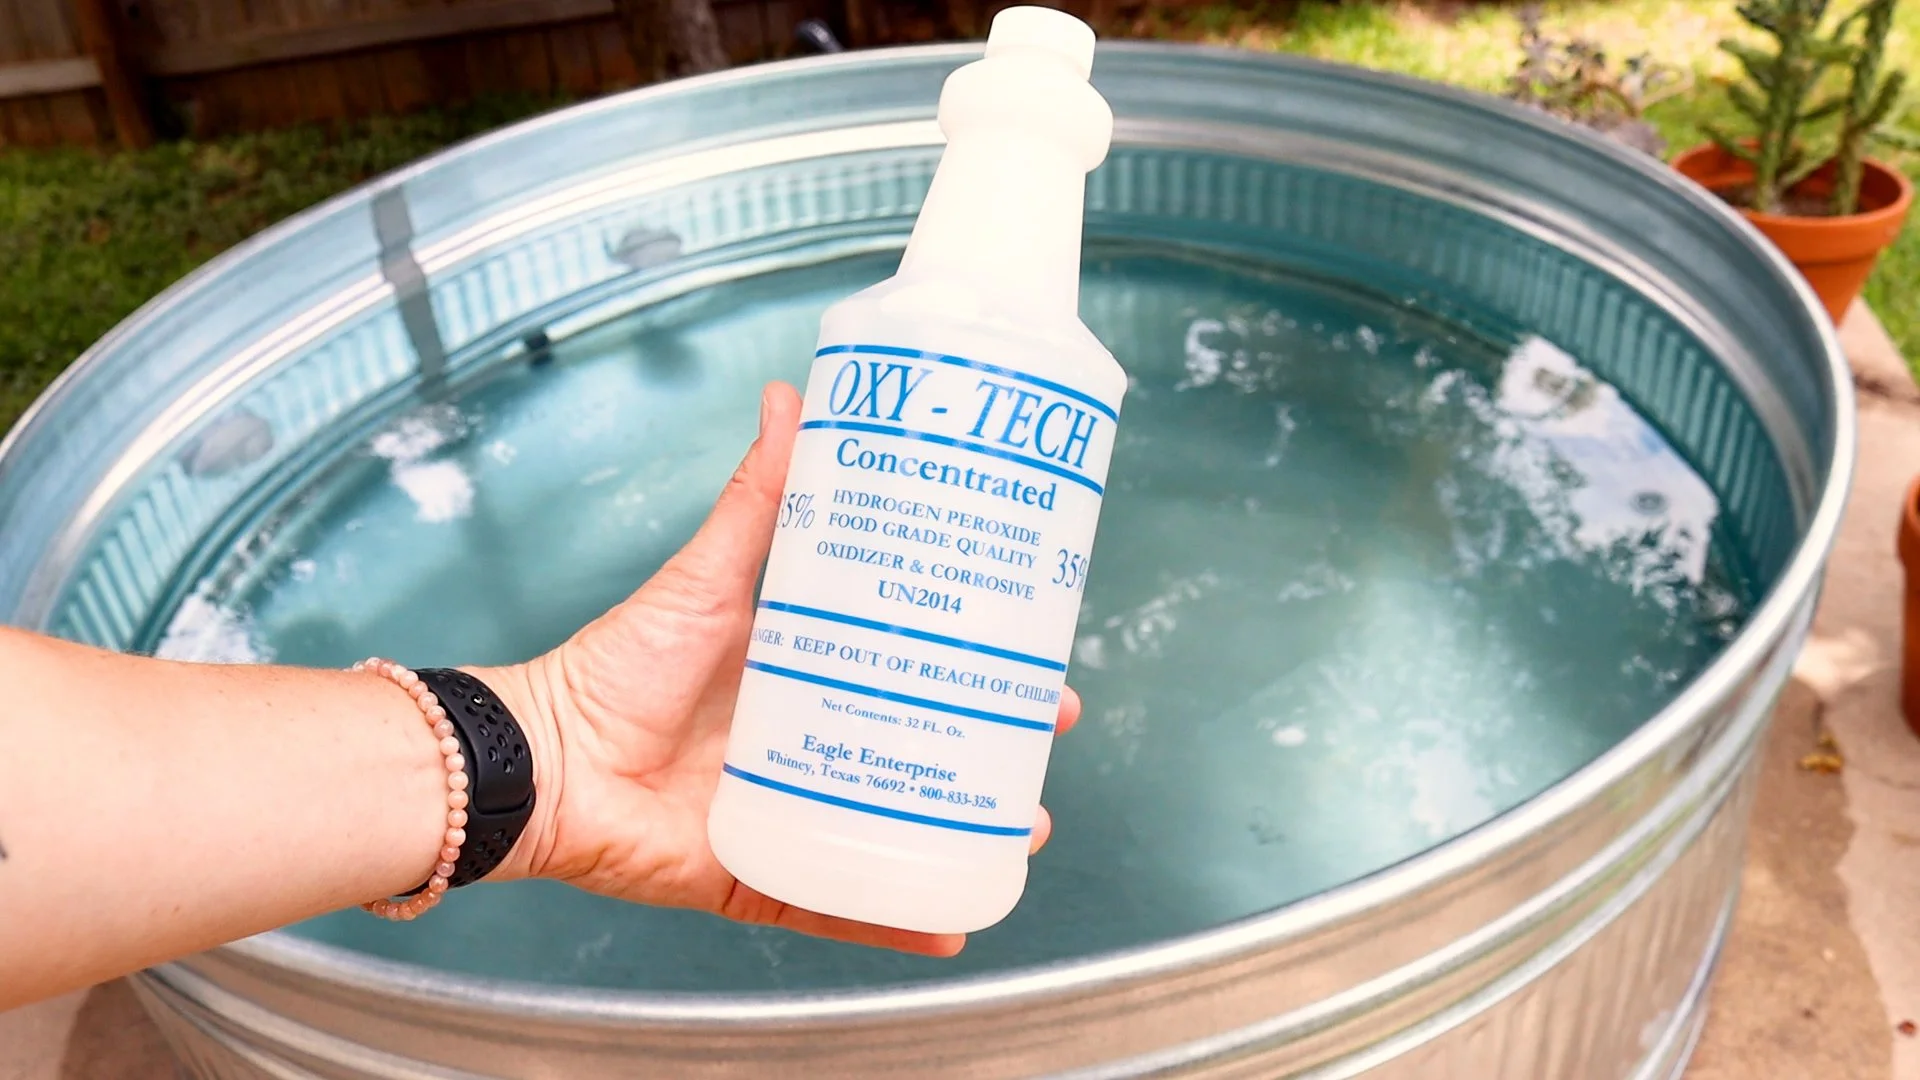
Once filled, it's time to treat the water. Instead of chlorine, I use 35% food grade hydrogen peroxide. It was a recommendation from my friends at Stock Tank Love and I've never looked back.
Why peroxide over chlorine?
No harsh chemical side effects
Won't cause the tank to rust (chlorine can)
Works just as well as harsh chlorine
When you drain, the water can go straight on your plants. It aerates the soil and nothing goes to waste
Use test strips to monitor your levels and add peroxide as needed to keep the water clean and clear.
Step 6: Set Up Your Timer
Plug your pump into a timer and set it to run on a schedule. I run mine several hours a day during pool season. This keeps the water circulating and the filter doing its job without you having to think about it. So easy.
Take It Further
The pool on its own is so great. But with a few additions it becomes a full backyard destination:
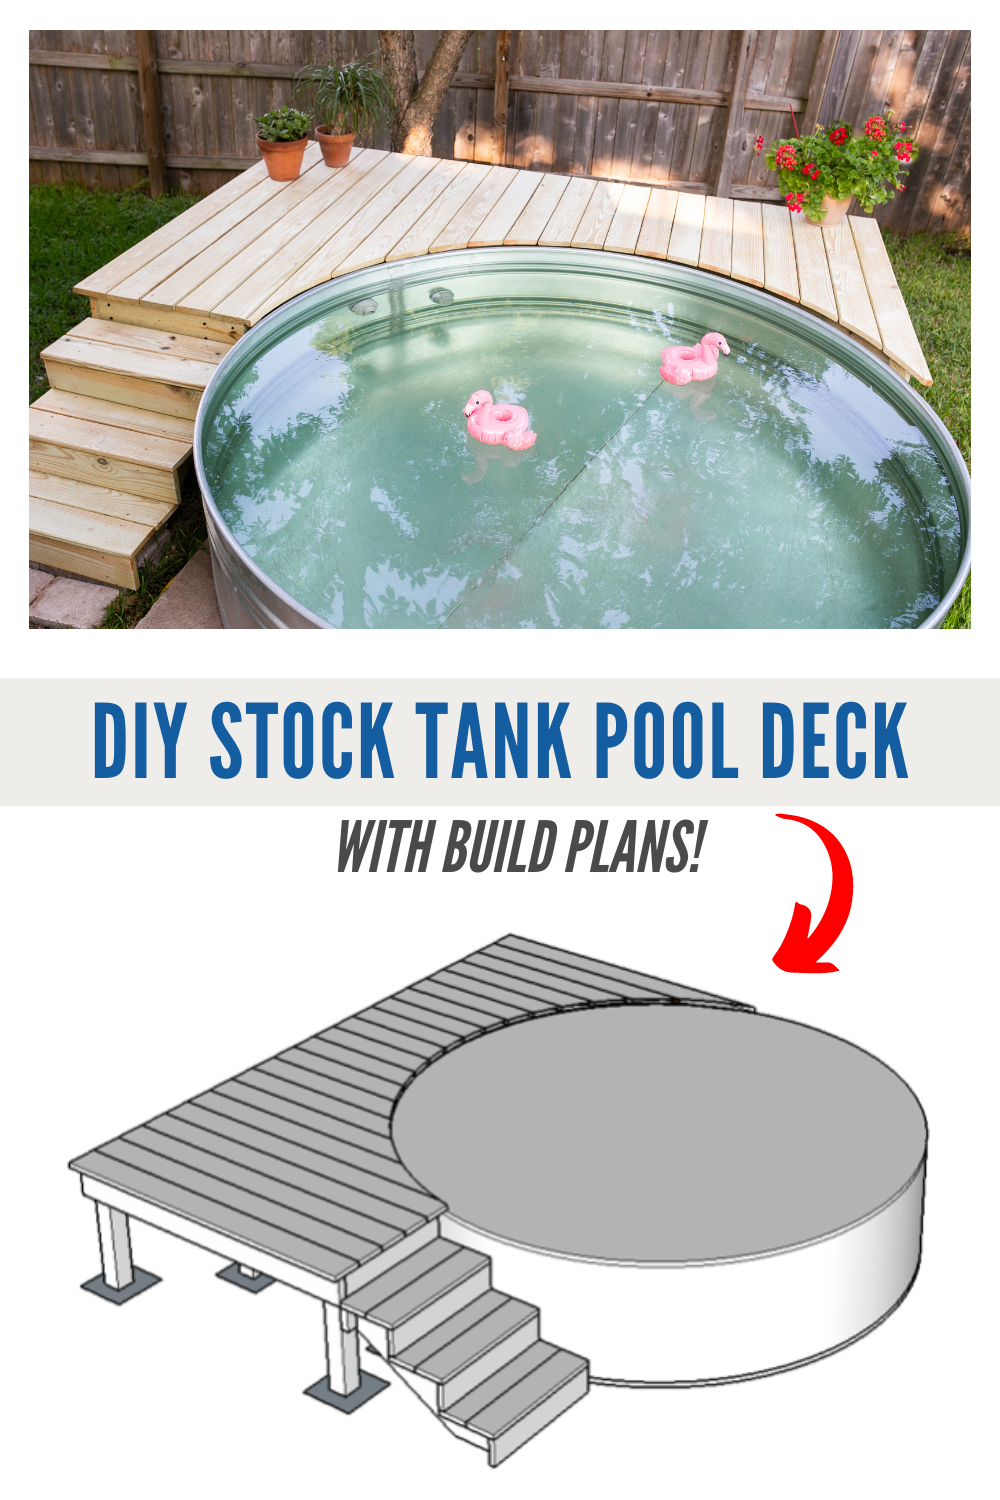
Add a deck. This is the single biggest upgrade you can make. A deck gives you a place to actually hang out around the pool. Sit with your feet in the water, set drinks down, lay out. It completely changes how the space feels and functions.
🪵 Get the Pool Deck Build Plans I designed these specifically for an 8' stock tank pool. But you can adapt them to fit different sizes if you’re up for it. Includes cut list, measurements, and full materials list.


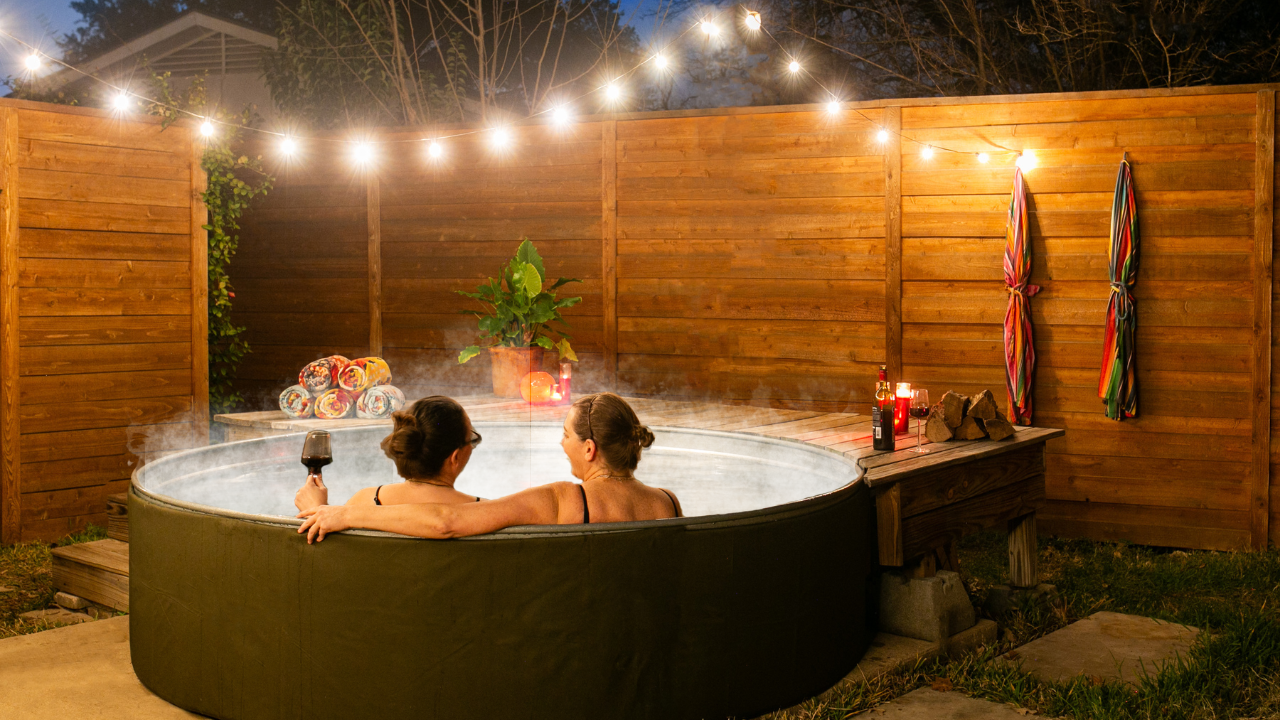
Add a cantilevered umbrella. Once you're spending real time in this pool, you'll sometimes want shade. A cantilevered umbrella is the move. It positions over the water without a pole in the way and makes the whole setup feel like an actual resort situation. It also keeps the water much cooler in our Texas sun. We added one and use it constantly.
☀️ Here’s one cantilevered umbrella option or another good option
Heat it. I figured out how to heat this same tank with a propane heater so we can use it year-round. You can switch between regular pool mode and heated mode whenever you want.

Spring Prep
See what I do to open up our pool for the spring/summer season here: https://www.instagram.com/p/CsG14qnvWOX/
Winter Prep
If you’d like to see how I winterize our pool in the winter months, check out the video here: https://www.instagram.com/p/Cz9a4uvAaEA/
We’ve also now added a cantilevered pool umbrella and it is amazing and keeps our pool so cool! Here is a link: https://bit.ly/3T6MFql
FAQs
Q: Where can I buy the stock tanks?
A: You can find the stock tanks at livestock supply or farm supply stores. They come in several different sizes. There are also many companies now that specifically sell these tanks as pools. Our local company that we know and love is Stock Tank Love. They will come and set the whole system up for you! I’m seeing these companies pop up all over the country.
Q: How is the maintenance?
A: I find it easy! I have the pump/filter on a timer so it turns itself on and off based on the schedule I set. Every morning I do a little skim of the pool. Once a week I check the chemical levels and adjust accordingly. I also do a backwash on the filter to clean out the filter media. Add water as needed. And that’s really it!
Q: Doesn’t the metal get too hot?
A: The cool water in the pool actually keeps the metal cool! The edges can get hot in the sun, but one splash of water instantly cools it off. Some people cut a long slit in pool noodles and place them around the edge of the pool. But we personally haven’t found this necessary. The big key in keeping everything cool is shade. In 2022 we added a cantilevered umbrella and that has been a huge improvement. The water stays so cool!
Q: Do pool chemicals hurt the metal of the pool?
A: Pool chemicals are necessary in keeping your water crystal clear and clean, but there are options. Chlorine works fine but you must be very careful to make sure your chlorine tablets do not get out of their container and touch the metal. In doing so, it can quickly damage the metal. In our pool, we alternatively use a pool grade Hydrogen Peroxide, which has many benefits over chlorine. The H202 does not need a container, it can be poured right into the water, it will not damage the metal and it is also a much safer, healthier option for human skin contact. We’ve had our pool since 2020 and have always used the hydrogen peroxide with great success!
Here is more info on using Hydrogen Peroxide from my pro friends at Stock Tank Love: “We recommend researching hydrogen peroxide as a possible alternative to chlorine. We decided to try H2O2 and have enjoyed it for over 5 years. It is healthy for people and pets as well as grass, plants, and trees when you drain. It can be maintained between 50-70 ppm with test strips.” We add it while the pump is running and let it circulate before testing.
Q: How much hydrogen peroxide do you add?
A: I add about a 1/2 cup to 1 cup at a time, depending on use. I add it while the pump is running, let it circulate about 15 minutes or so and then test with my test strips. I try to keep mine above 50 ppm at all times and try not to go over 100 ppm. Ideally it will stay at 70-80 ppm. If we use the pool more, I’ll test and add more often. Just depends on use, rain. etc.
Q: Do you worry about rust?
A: We really don’t. Again, it helps that we use the hydrogen peroxide instead of chlorine. Regardless of what chemical is used, it’s important to not over treat the water. We haven’t seen any rust (6 years in so far).
Q: How often do you run your pump/filter?
A: I added a super basic pool pump timer and have mine set to run twice a day - during the morning and during the afternoon, for about 3 hours each. That amount of time seems to work great, but you can easily adjust your time for less or more. It’s not necessary to run the pump continuously all day. Warmer months need more filtration, but I’ve found that 6 hours is plenty for this above ground pool in our hot Texas climate.
Q: How big is your Stock Tank Pool?
A: We started off with a 6’ wide x 2’ deep pool, but have since upgraded to an 8’ wide x 2’ deep pool. You can see our 8 footer in my post about the Stock Tank Pool deck I built HERE!
Q: How do you winterize the pool and how do you set it up for summer?
A: Winterization is easy. I have a short video showing you how I winterize our pool HERE and a video showing you how I get the pool ready for summer HERE!
Q: How do you drain the pool?
A: There is a drain hole on the bottom side! I can thread on a garden hose. And because we treat our water with hydrogen peroxide and not chlorine, we can use the water to water our plans and yard. Any remaining water I get out with my shopvac.
Do you have a question not covered? Leave a comment below and I’ll get it answered for you!
If you like this project, you might also like these!

If you liked this project and want to stay up to date with what I’m building, then be sure to sign up for my emailed newsletter and you’ll get an email when I post something new. See you soon!
(Most of the links listed above are affiliate links. As an Amazon Associate I earn from qualifying purchases. I super appreciate your support for Maker Gray in this way)